
Maximize your screen real estate. Free up some space by taking advantage of Thin Column Mode and Collapsed Headers to minimize visual noise and focus on the scores. These modes can be found under the View toggle options.
Work Smarter, Not Harder: 24 Tips for the TeacherPlus Gradebook
The TeacherPlus Gradebook is an essential part of the Rediker Software system, acting as the bridge between your school’s many classrooms and the central front office. Today, we dive into the top 24 tips teachers need to know about the Gradebook so they can streamline their workflow and make the most of the system.
Article Table of Contents:
Workspace and Efficiency
Grading and Data Shortcuts
Per Student Data and Tracking
Privacy, Communication and Notes
Watch the Video ▶
 Go to Video
Watch the original webinar recording to see these tips in action.
Learn More About the Gradebook
 TeacherPlus Gradebook
Interested in learning more? Current users can read our Support Guides. We also offer in-depth professional development sessions with our expert Rediker Trainers. Reach out to your Rediker Account Manager or email sales@rediker.com to get started.
Not using the TeacherPlus Gradebook yet? Learn more by visiting the TeacherPlus Gradebook product page or reach out to us to schedule a demo.
Workspace and Efficiency
Tip #1
Customize Your Startup Screen
Respawn Location – Customize Your Startup Screen
Be ready to jump-start the day the moment you log in. You can save time and clicks by setting the default location that your Gradebook will open to. Do you want to open to your most frequently used class? How about the homeroom, or a co-teaching section? You could also have it open automatically to the last used page you were on.
Navigate to Settings > General Settings > Startup Screen.
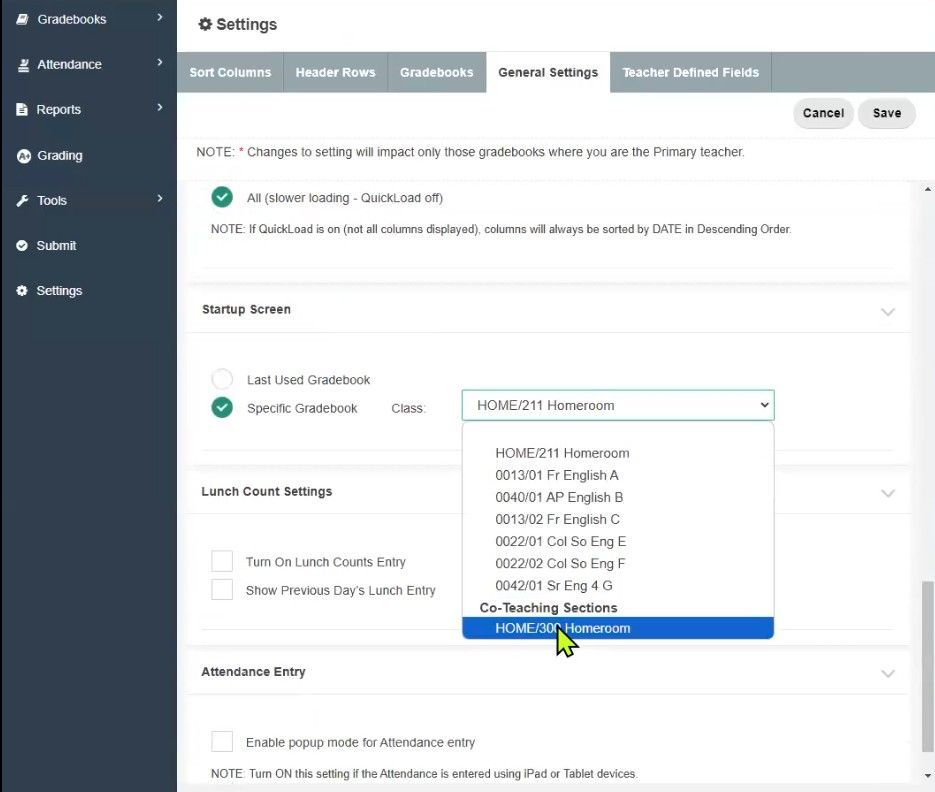
TeacherPlus Gradebook Startup Screen Settings
Tip #2
Create Seating Chart Clusters
Drag-and-Drop Easy – Create Seating Chart Clusters
Break away from the standard grid seating chart format. Maybe you have your classroom arranged in a circle? Maybe your students are breaking into pods for group study? Use the Gradebook Seating Chart to map out where everyone will sit in an alternative seating arrangement. In Edit Mode, drag-and-drop the student cards to arrange them. Save as many versions as you need. When you are done using a certain arrangement, you can easily toggle back to your standard view.
Navigate to the Seating Chart > Add New or Edit.
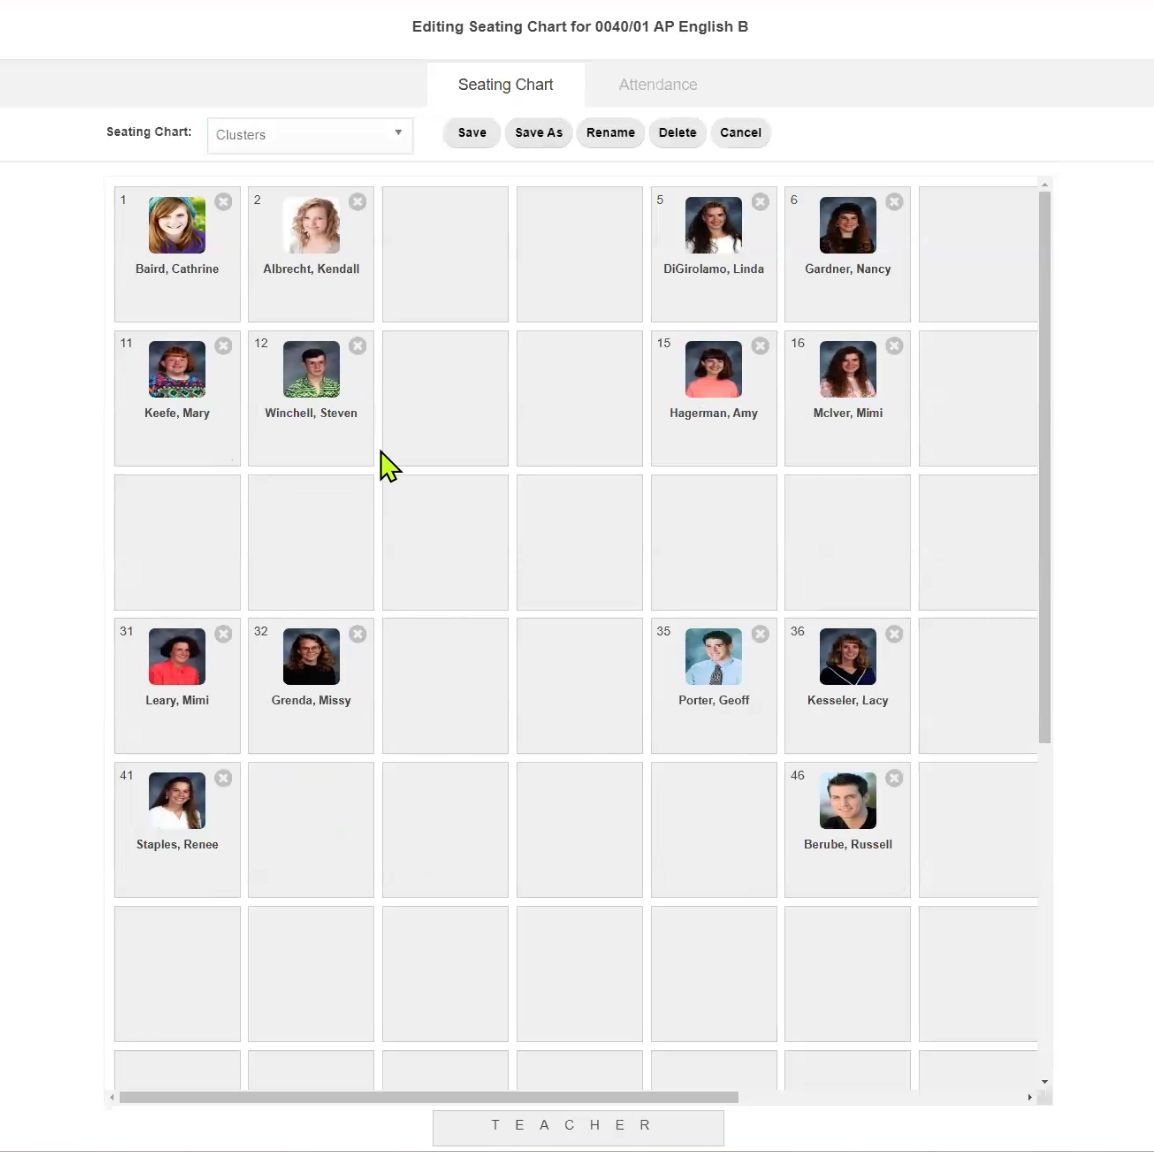
TeacherPlus Gradebook Seating Chart
Tip #3
Add Insights to Your Seating Chart
More Than Matching Names to Faces – Add Insights to Your Seating Chart
Customize your seating chart to add more information next to each student’s picture. Choose anything you might need to reference, such as the student’s gender, nickname, or homeroom. This data comes directly from the AdminPlus database so you can be sure it’s up to date.
Navigate to the Seating Chart > Choose Add New or Edit > “What fields to show on seat?” Toggle on any of following data points:
- Picture
- First and Last Name
- ID Number
- Averages and Grades
- Assignment Columns
- AdminPlus Database Field (Pick One):
- Parent/Guardian
- Street
- City
- State
- ZIP
- Phone
- Homeroom
- Gender
- Birth Date
- Nickname
- Counselor
- Student Email
- IEP Writer
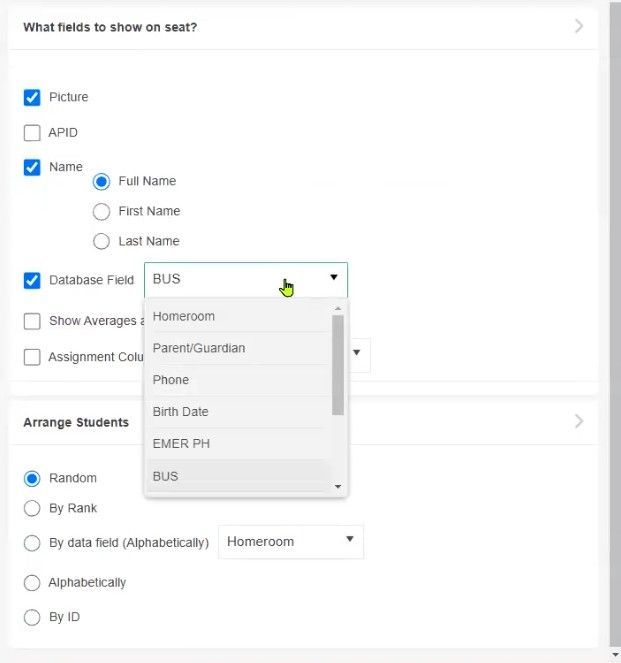
TeacherPlus Gradebook Seating Chart Label Settings
Choose what label fields will show on the TeacherPlus Gradebook seating chart.

TeacherPlus Gradebook Seating Chart with Labels
After setting the labels, you can see they displayed under the student's picture on the TeacherPlus Gradebook seating chart.
Tip #4
Use Quick Load (for Large Gradebooks)
Wrangle Up that Data – Use Quick Load for Large Gradebooks
Feeling the need for speed? Have too many assignments cluttering up your view? Toggle on the built-in Quick Load function to combat any lag that you might be dealing with due to a high volume of data. This will pare down the number of assignments it displays to the most recent, so even if it’s been a “long semester” and you have 10-20 assignments piling up each week, you can still manage your Gradebook with ease.
In the Quick Load Settings dialog box, do either of the following:
- Select 1 Day (faster loading) for the fastest page-load.
- Select x Days, in which x is a custom number of days between 1 and 99.

TeacherPlus Gradebook Quick Load Settings
Tip #5
Toggle Column Icons
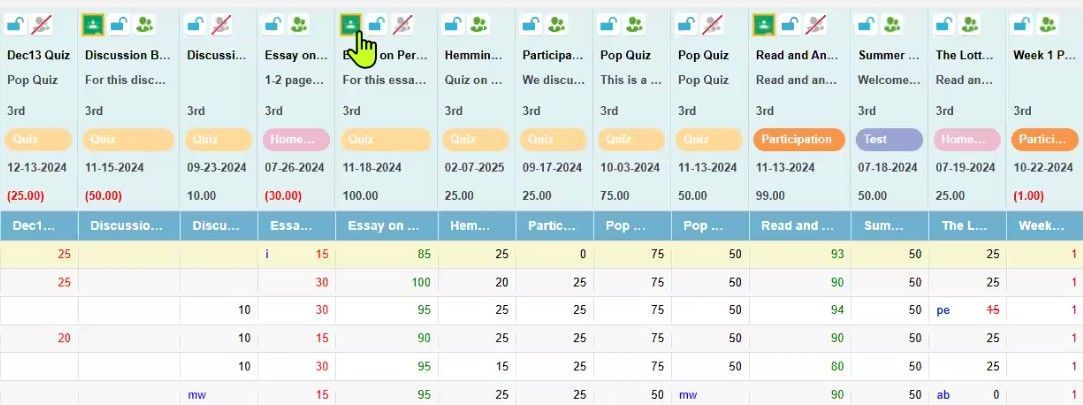
Tiny But Mighty – Toggle Column Icons
Have some fun with icons in the column headings. These icons act as a quick way to flip the switch to lock/unlock the column from being edited further and share/unshare the assignment in the PlusPortals.
Dive deeper into the settings by double-clicking the column header or right-click > Edit Column Name and Details. Within the settings you can also choose to add the assignment as Coursework to the PlusPortals ahead of time, as well as display the count in averages.
As a bonus, if you have your Gradebook linked with
Google Classroom, an extra icon will show up to indicate that the column data is coming from that integration.
TeacherPlus Gradebook Column Header Icons
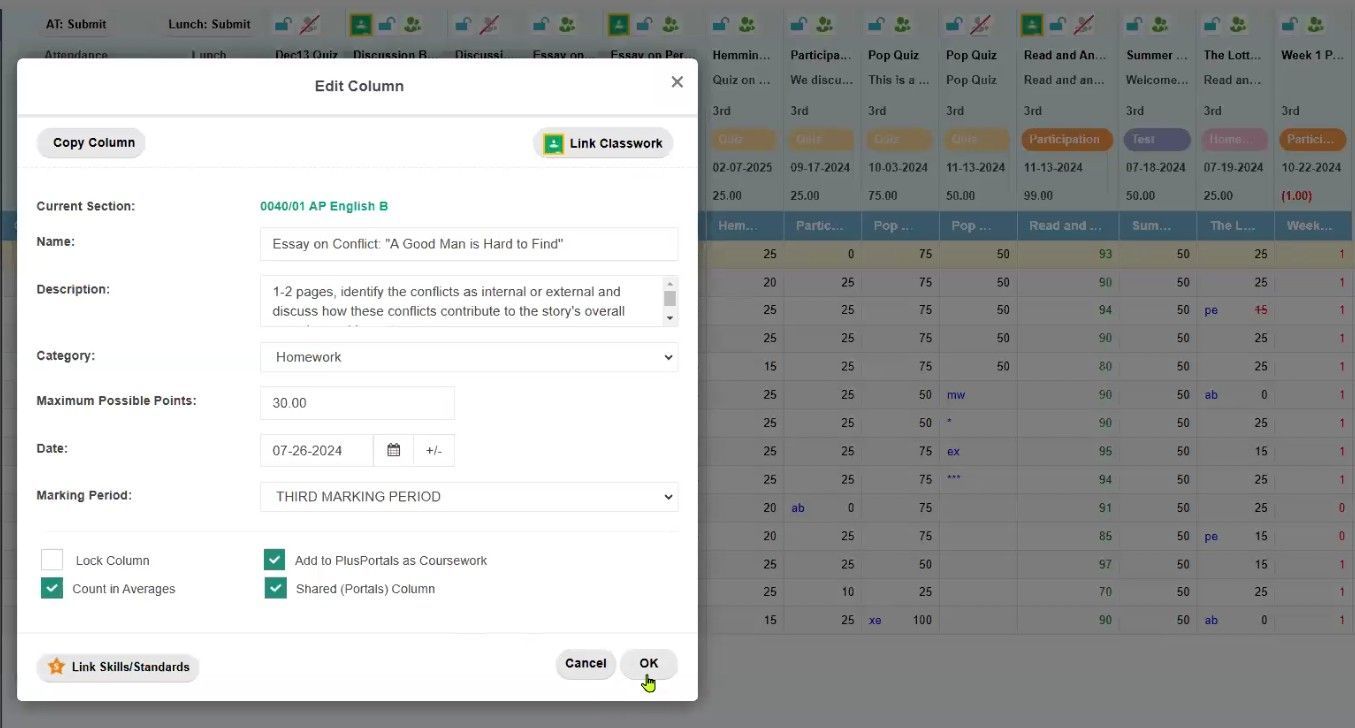
TeacherPlus Gradebook Edit Column Settings
Tip #6
Minimize Columns and Headers
Squeeze it – Minimize Columns and Headers
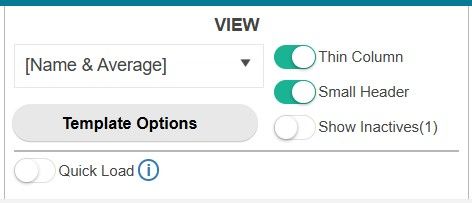
TeacherPlus Gradebook Thin Column and Small Header Options
Grading and Data Shortcuts
Tip #7
Drop the Lowest Grade (Individual or Class)
Benevolent Balance – Drop the Lowest Grade
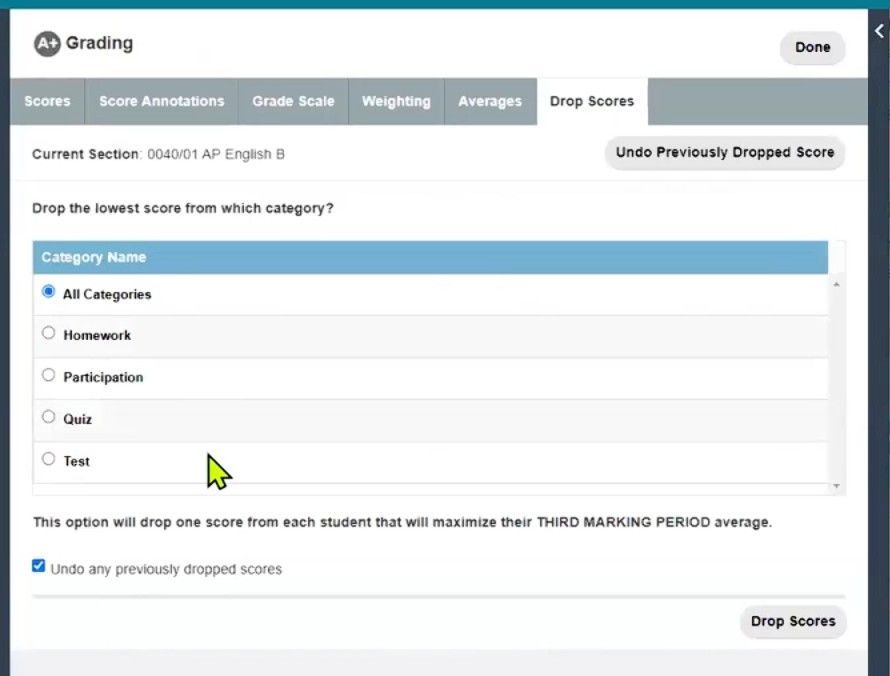
Give the students a break by dropping the biggest impact-grade for an entire class by category (homework, participation, quizzes, tests, etc.). The system automatically identifies the grade with the largest impact, so you don’t have to. Use this feature to maximize the class average for that marking period.
Spot a particular student that you want to address individually instead of the whole class? Simply right-click and choose Drop Lowest Score. From there you can set the category that it will reference specifically. A single score will automatically be dropped for that student.
TeacherPlus Gradebook Drop Scores Settings
Tip #8
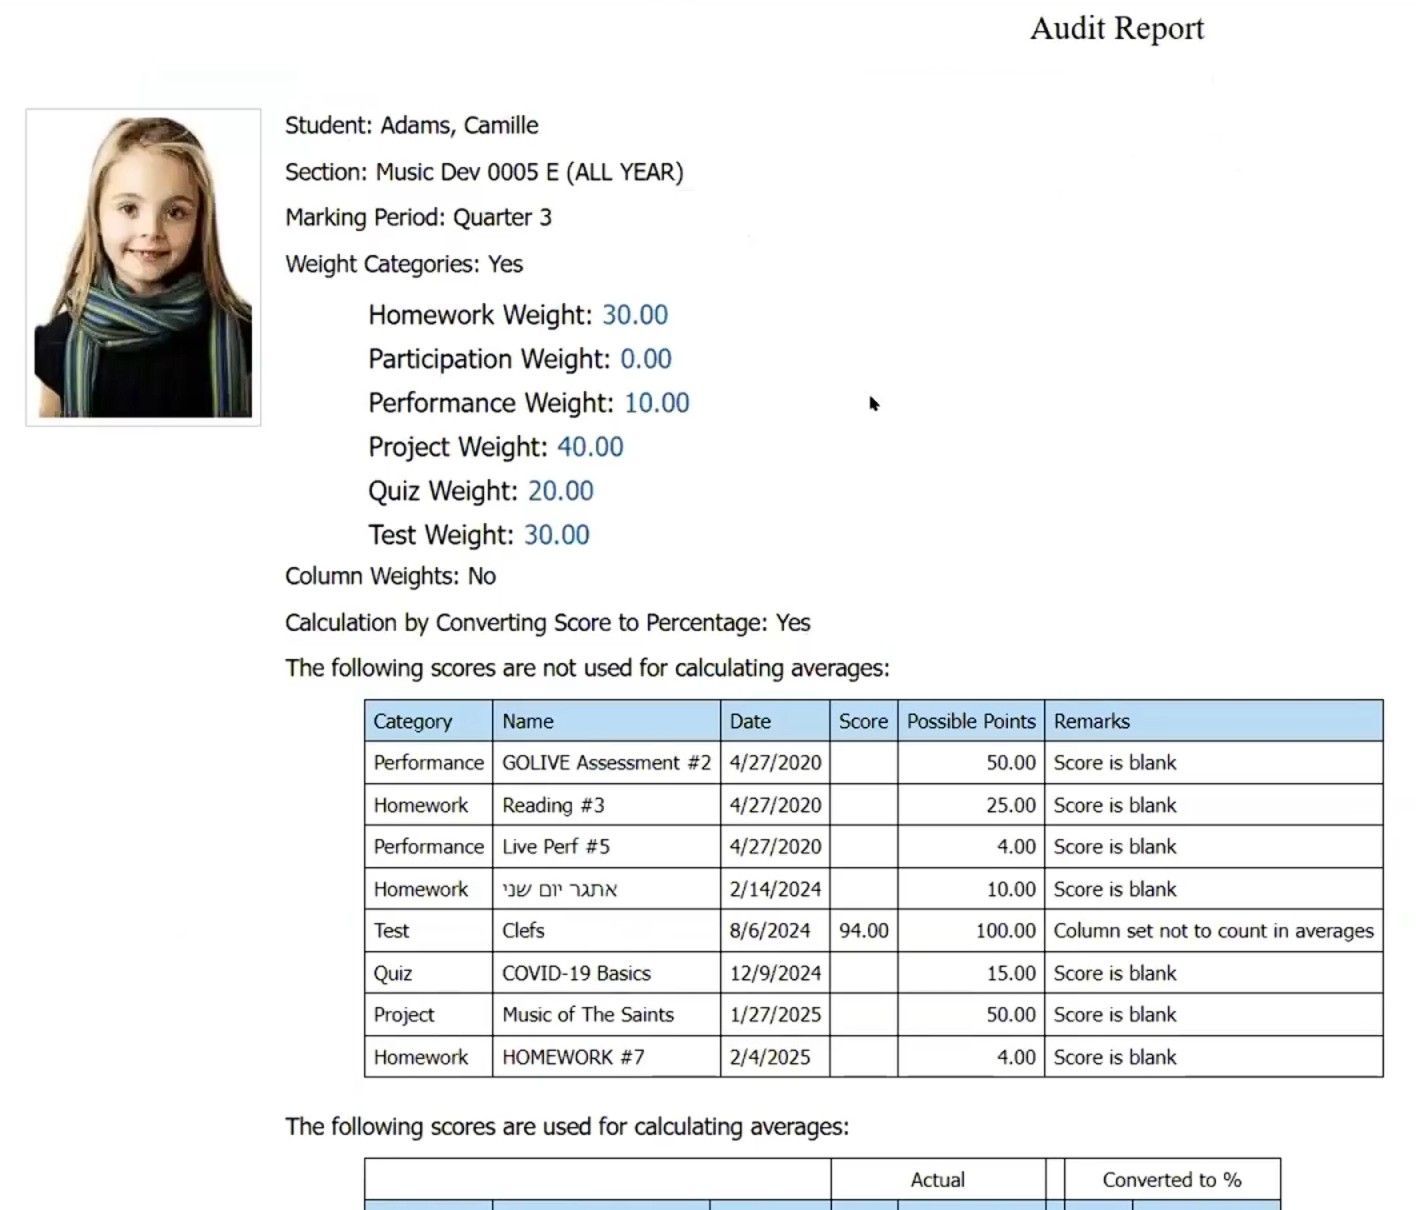
Run the Grade Audit Report
The Proof is in the Pudding - Grade Audit Report
Have you ever had a parent question if their student’s grade was calculated correctly? With the Grade Audit Report, you can cover your bases with undeniable proof. Have this report handy at your next parent-teacher conference to show the detailed breakdown of how a student’s grade is calculated, including weighted calculations, excluded scores, individual category totals, and the master calculation for the quarter.
Right-click the student’s average > Audit Report. This will serve up a PDF copy of the report that you can show on screen or print out.

Tip #9
Batch Enter for All Students
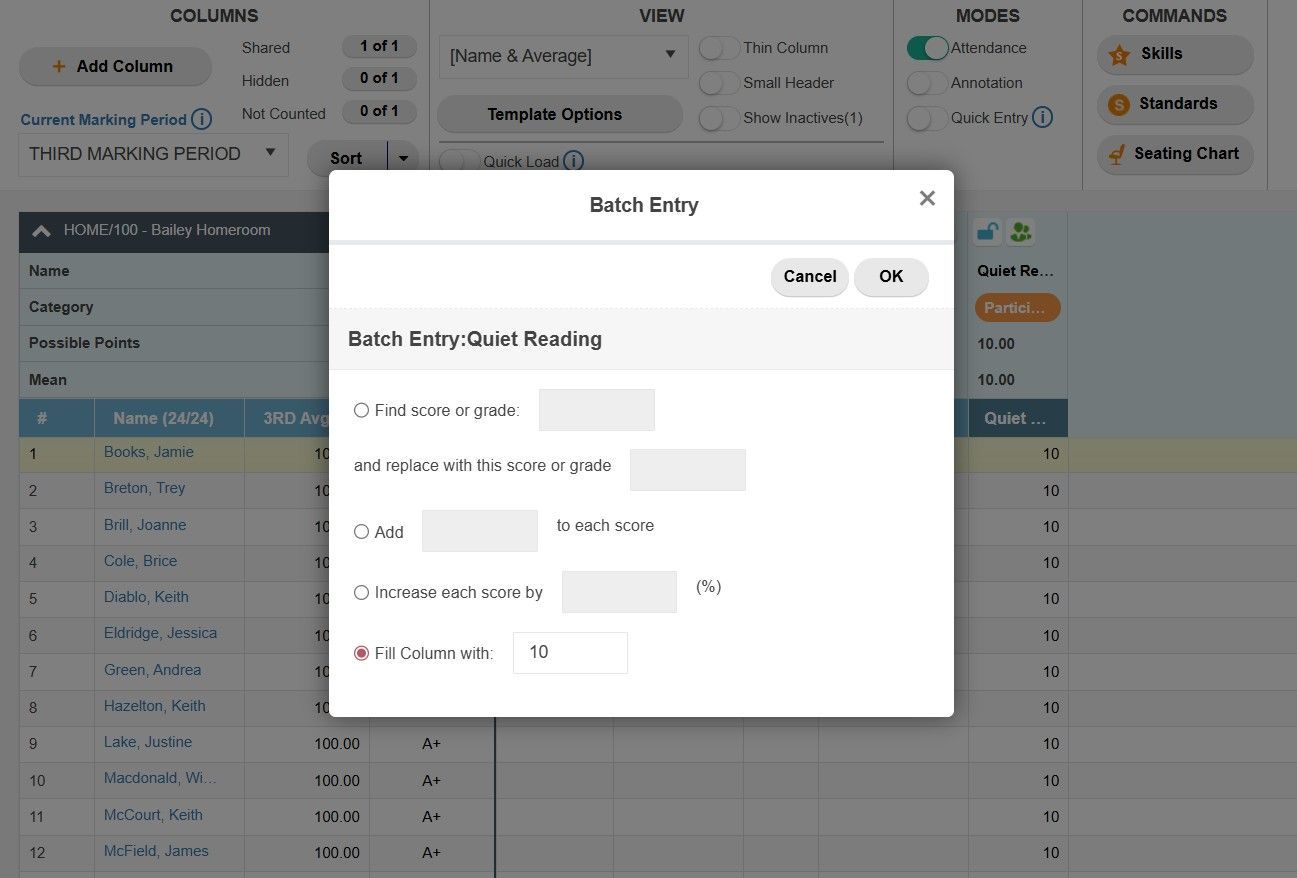
Like Magic, Your Done - Batch Enter for All Students
Bypass repetitive score entry. When you know most, or all of your students have the same number of points, use the Batch Entry function to instantly set scores for everyone. This comes in handy if you are handing out participation points, for example. Even if you have one or two students with different scores, just go back in and alter those individuals. Entering in one or two separate scores beats doing it all 30 (or so) times for the whole class.
Right-Click in the assignment column and choose Batch Entry: Current Column.
TeacherPlus Gradebook Batch Entry Options
Tip #10
Unlock Header Row Stats
Statistical Madness - Unlock Header Row Stats
Did you know there are 11 hidden rows that can serve up extra stats about each of your assignments? These powerful little nuggets work behind the scenes to calculate averages, ranges, and more. Get in there and get a little crazy. Toggle on these rows and stack up a gold mine of statistical counts that could reveal trends about your assignments and students.
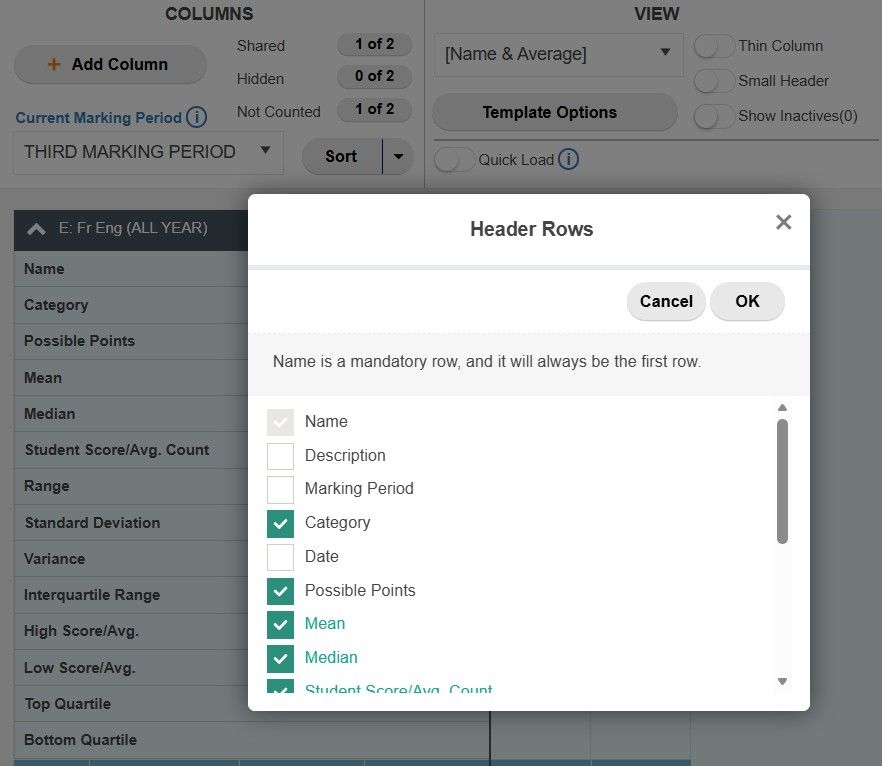
Right-click Header Rows > Select Header Rows. Choose any of these calculation methods:
- Mean
- Median
- Student Score/Avg. Count
- Range
- Standard Deviation
- Variance
- Interquartile Range
- High Score/Avg.
- Low Score/Avg.
- Top Quartile
- Bottom Quartile
TeacherPlus Gradebook Header Row Options
Tip #11
Export to Excel
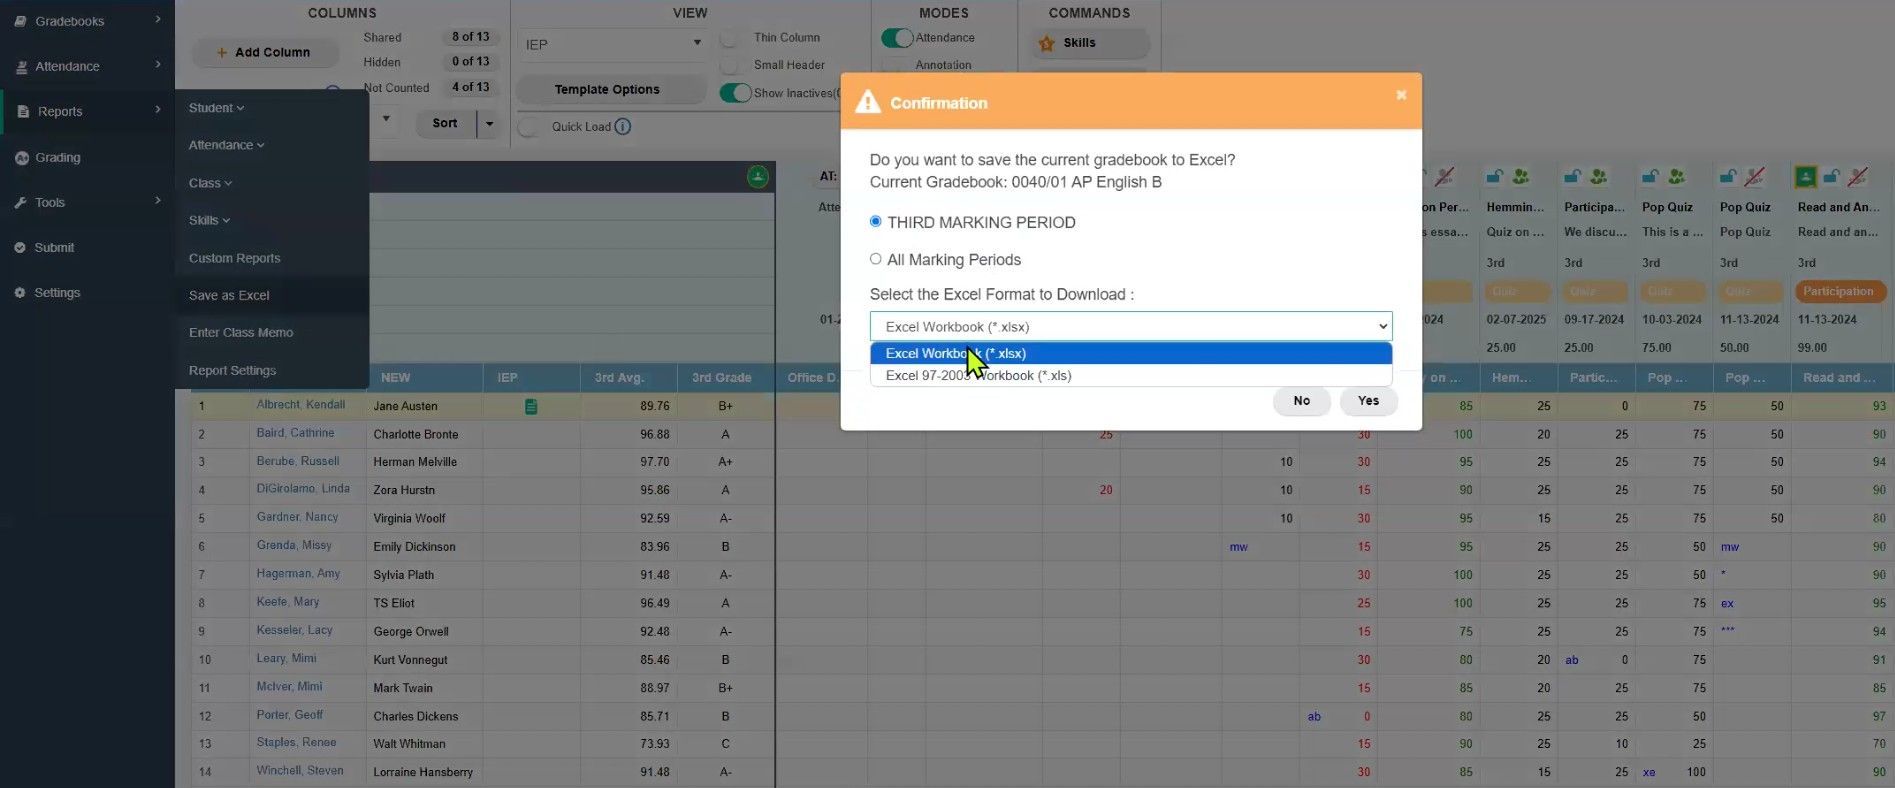
Time to Pivot – Export to Excel
Add a little flourish to your Gradebook data and show off with some more advanced graphical visuals. We all know Excel is king when it comes to PivotTables, so why not use it? Save your Gradebook as an Excel document and experiment with tables, graphs and charts. Who knows? This could come in handy at your next departmental meeting, parent-teacher conference, or just for your own reference.
Download the exported Excel Workbook file by going to Reports > Save as Excel.
TeacherPlus Gradebook Excel Export Options
Tip #12
Link to Google Classroom
With Our Powers Combine – Link to Google Classroom
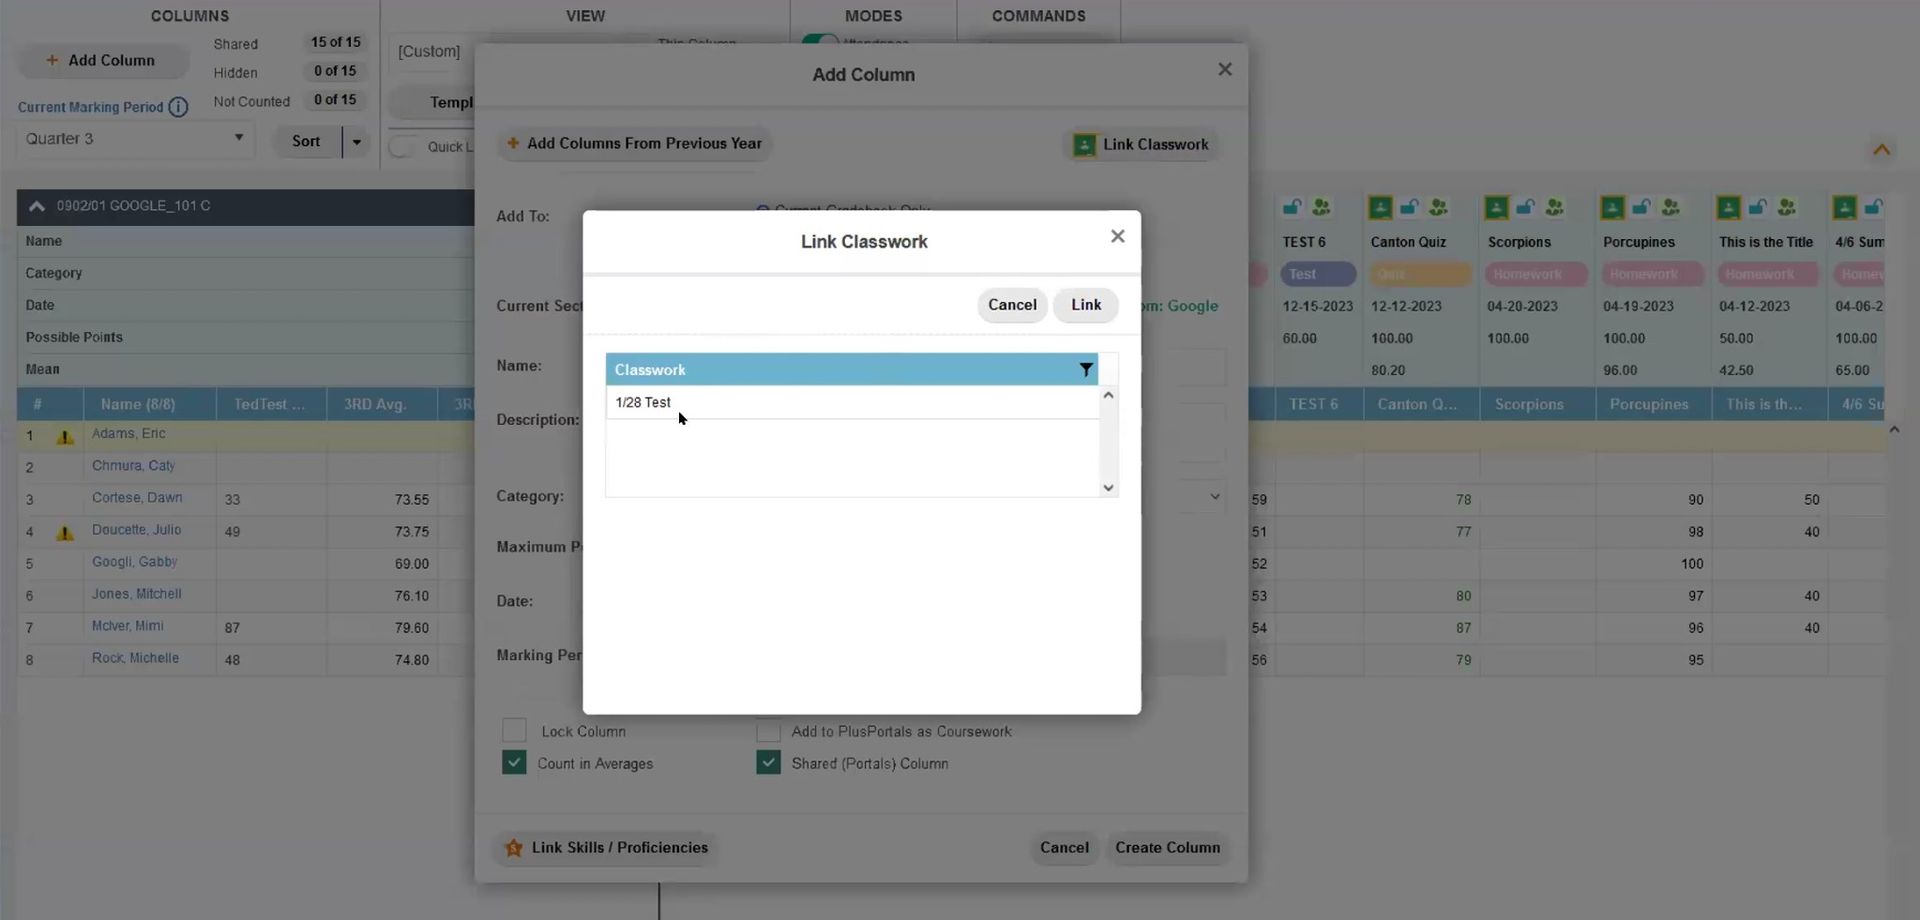
Using Google Classroom? We understand that double-data entry is a nuisance. When it comes time to generate report cards, you’ll need those scores to come into the Gradebook and ultimately, AdminPlus. So how do you get the data from Google Classroom into the TeacherPlus Gradebook without double-data entry? Simple – you can use the built-in “Link.” When you add an assignment into the Google Classroom environment, you can then link that to a column in your Gradebook. Click the “Link Classwork” button and watch as it instantly pulls in the assignment description and points for each student. Whenever you make changes to an assignment that has already been linked, simply click the square Google Classroom icon for that column within the TeacherPlus Gradebook, and it’ll refresh any new incoming score data. Or click the round Google Classroom icon near the title of the class to Sync All.
(If you don’t see the Google Classroom Link in your Gradebook, talk to your school’s TeacherPlus Management Admin – this integration must be enabled first.)
TeacherPlus Gradebook Link to Google Classroom
Tip #13
Add Annotations
Little Reminders – Add Annotations
Add your own “secret” codes in the Gradebook and tag custom annotation notes that are meaningful for you. L = “Late.” M = “Missing.” …And SSB could mean, “Super-Secret Bonus Points!”
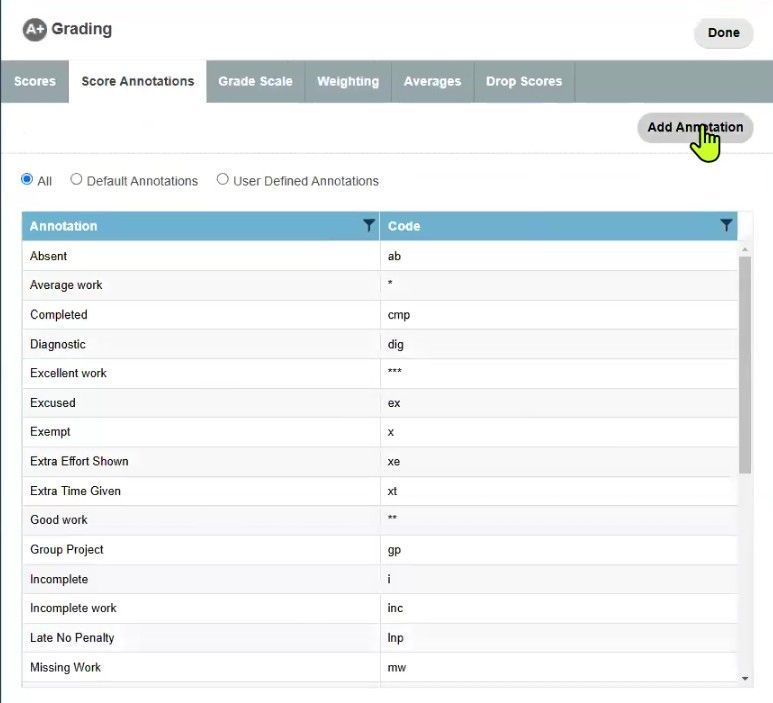
Annotations are a great way to set little reminders for yourself about what’s going on with a particular student’s score. Usually, the codes come pre-set from school management (via the TeacherPlus Management Site). If your school has enabled user-defined annotations for teachers, you can easily add your own too. Access it under Grading > Score Annotations > Add Annotation.
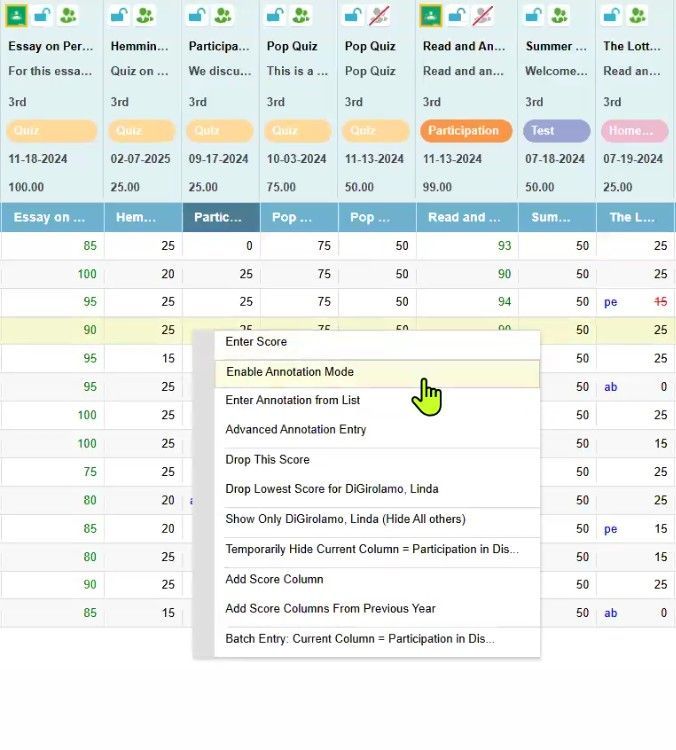
Once you have added the new code to your list, you can start using it. Toggle on Annotation Mode to unlock one-click access and add annotations codes directly to any cell. Or right-click to Enable Annotation Mode, Enter an Annotation from a List, or get into Advanced Annotation Entry.
Tip #14
Display Marking Period Point Totals
Quick “Math” - Display Marking Period Point Totals
Interested in tracking raw points earned, rather than percentages? You can easily add a dedicated column that will tally up the points for each student and automatically keep a running total during the entire marking period as you add more point-based assignments.
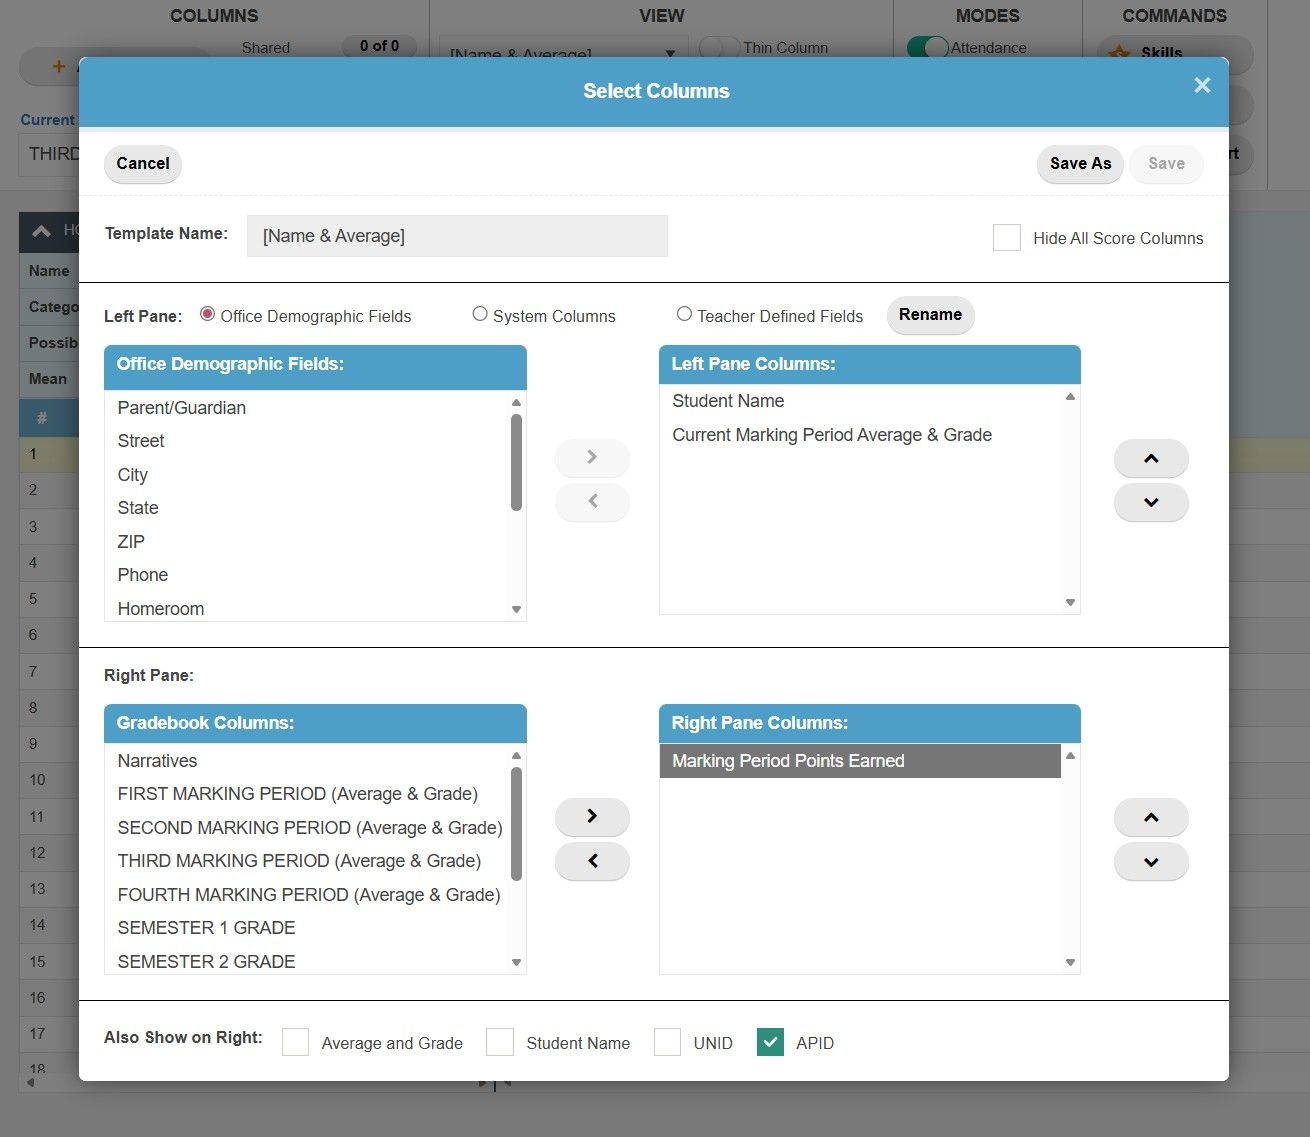
In the Custom View option, choose to show the Marking Period Points Earned by adding it to the Right Pane. (Check out Tip #15 to read more about Custom Views.)
TeacherPlus Gradebook Marking Period Points Earned Selection for Columns
Per Student Data and Tracking
Tip #15
Set Up Custom Views
Data Beyond the Numbers – Set Up Custom Views
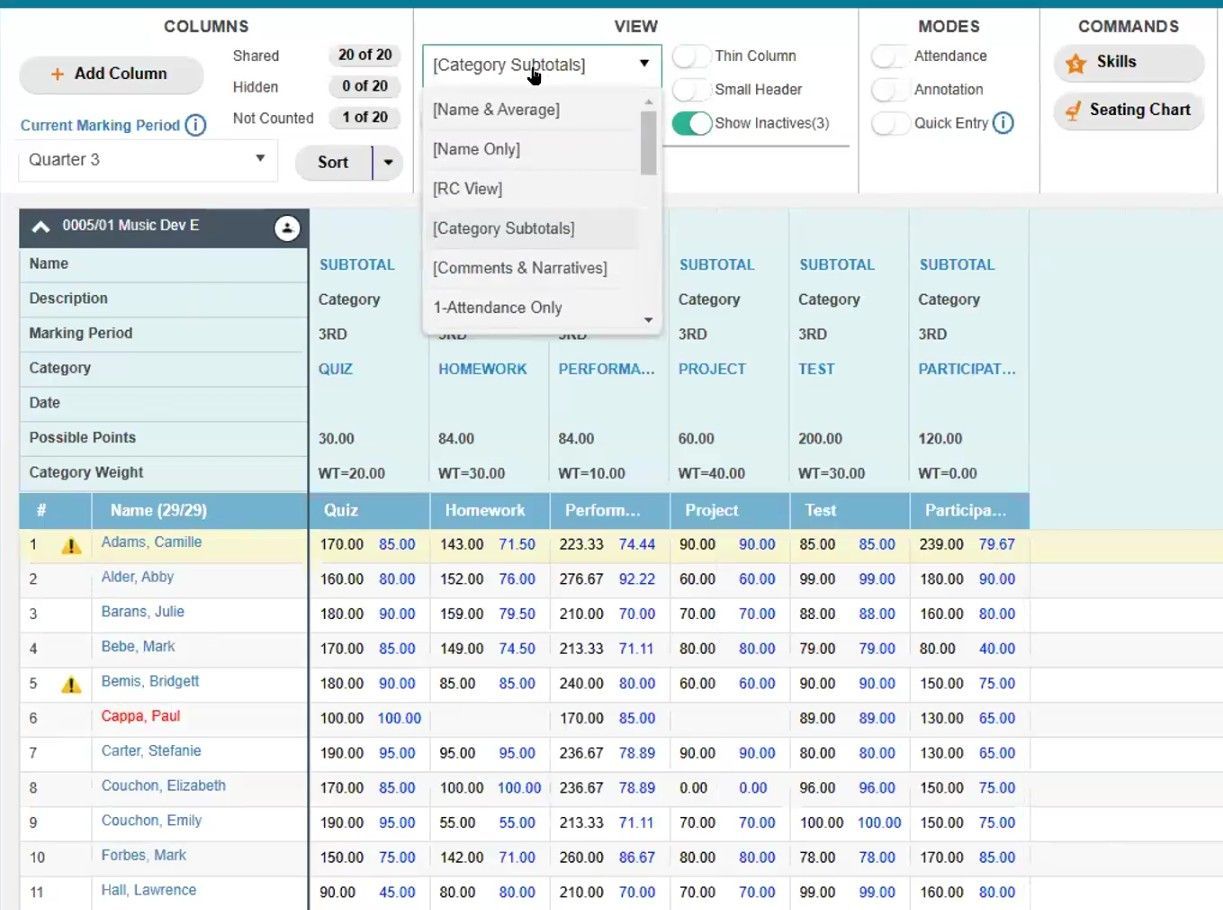
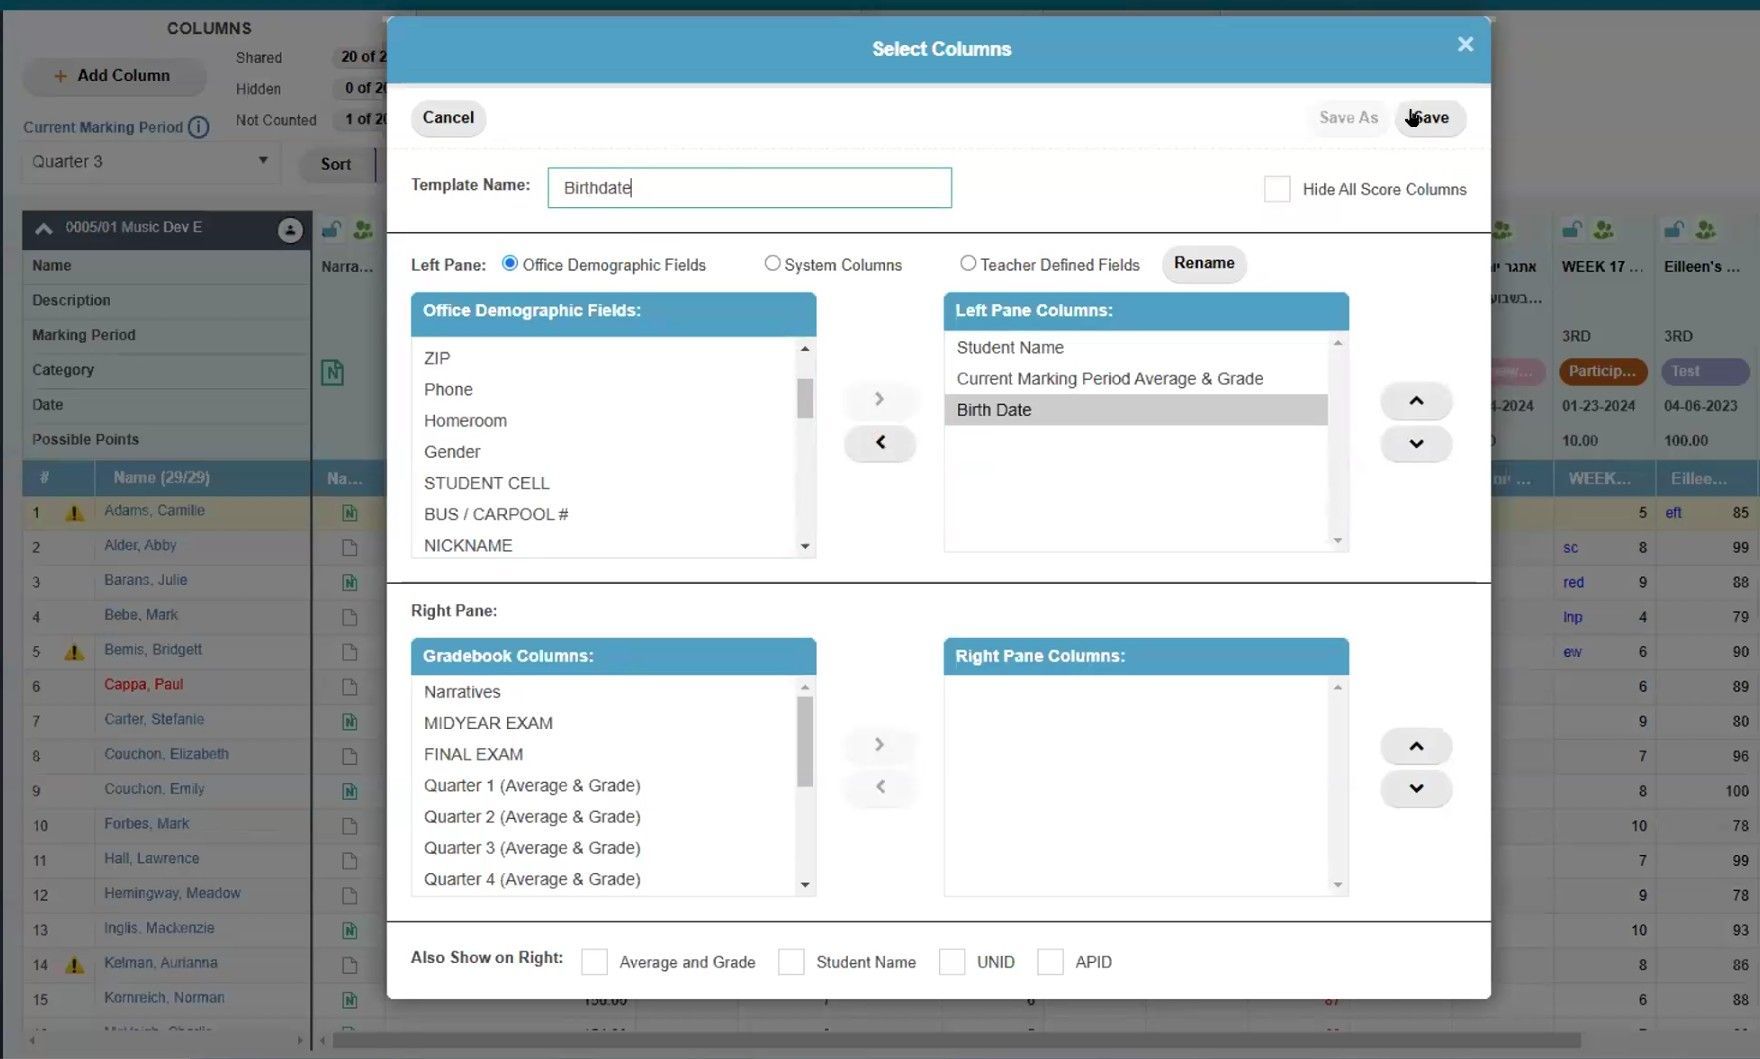
The Gradebook comes with a few out-of-the-box Views, like the Report Card (RC) View or the Category Subtotals View. This is a quick way to instantly display specific columns and labels. Beyond just showing grades, scores and point calculations, you can also track individual student demographic data that’s on file in the AdminPlus Database like addresses, phone numbers, bus numbers, and locker numbers.
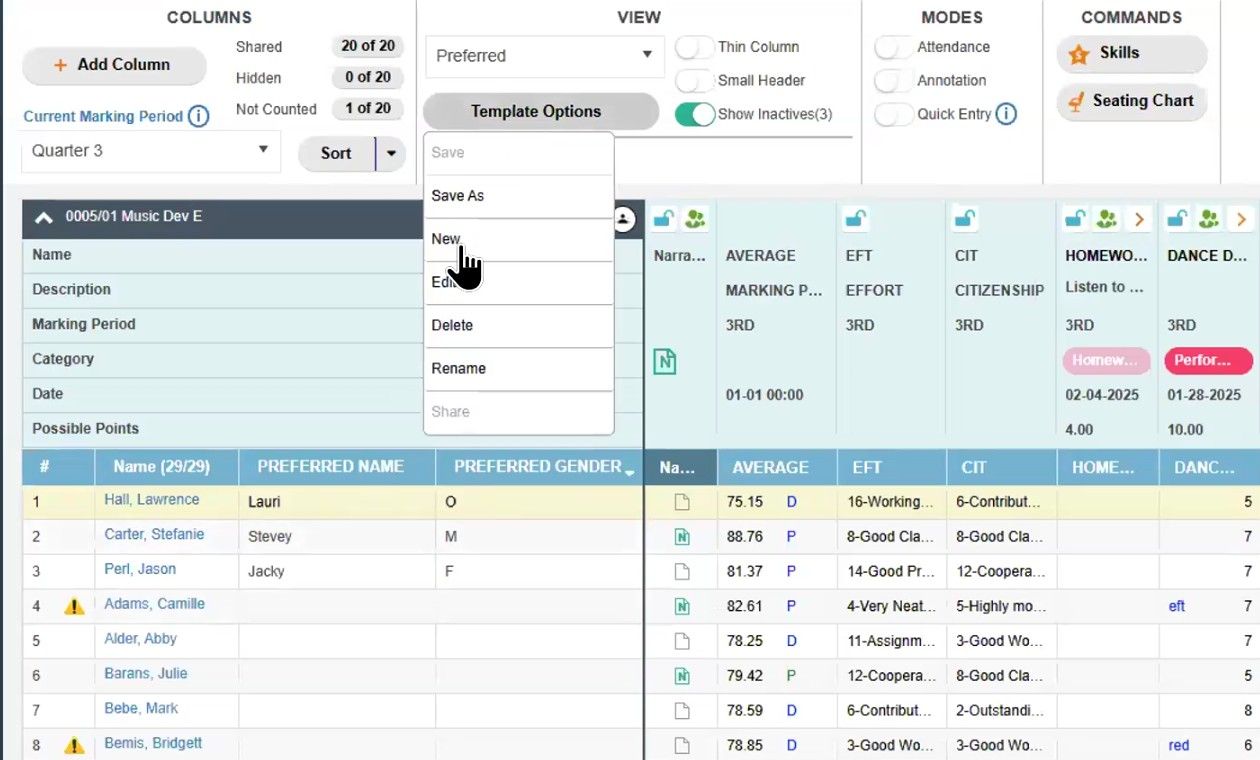
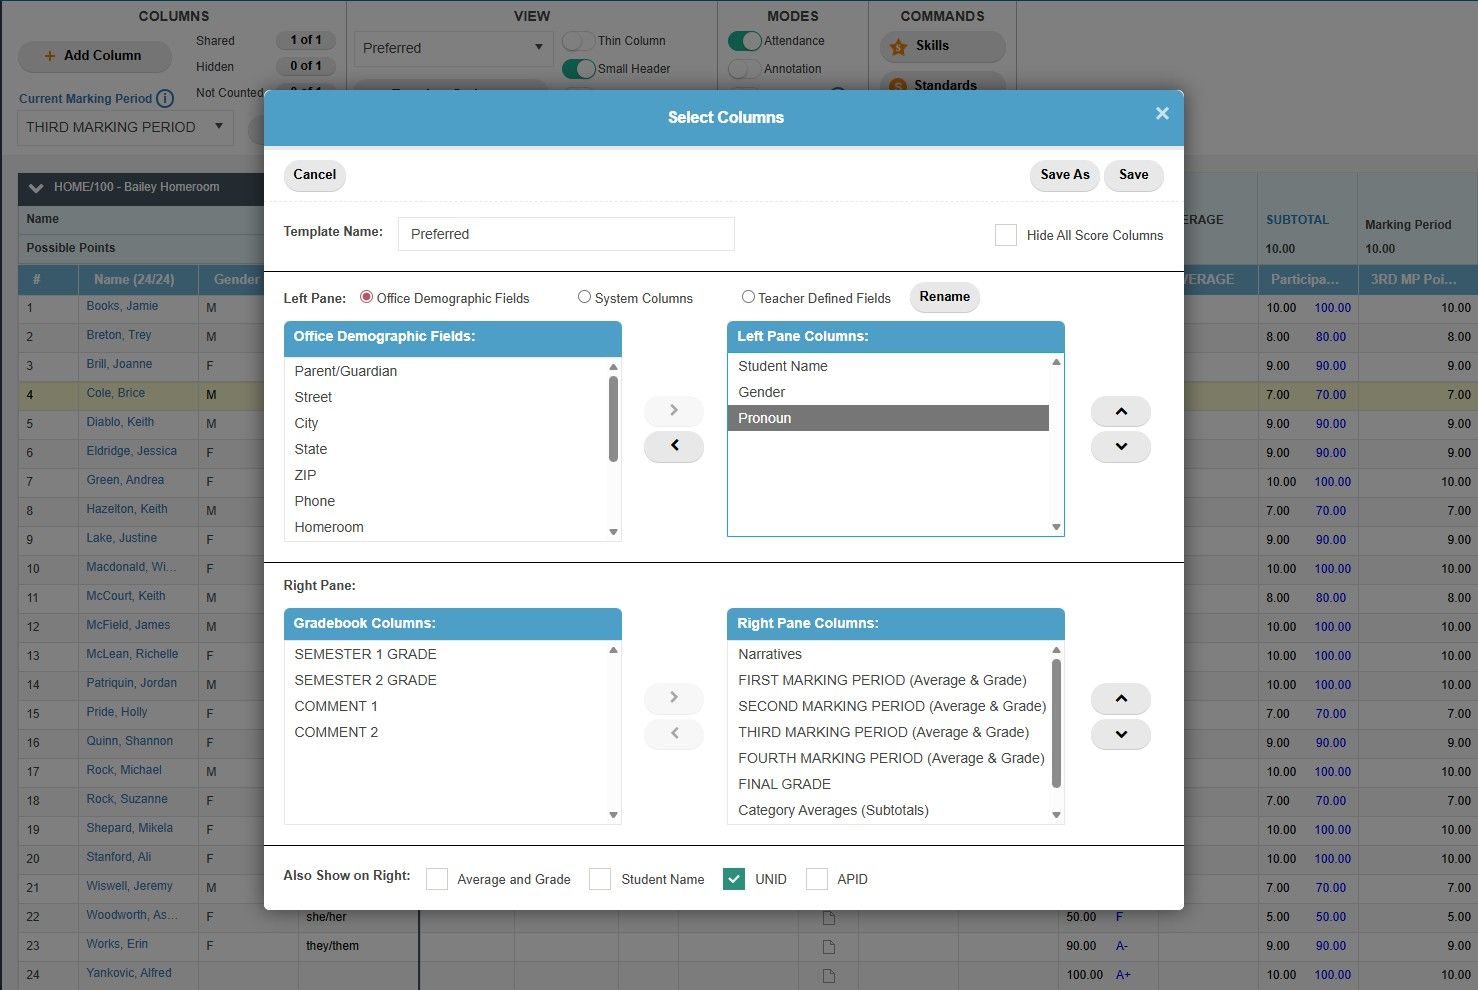
Get started by clicking the Template Options button in the View section of the Gradebook. Choose to add data to the Left Pane, sourced from Office Demographic Fields, System Columns or Teacher Defined Fields. You can create and save as many custom Views as you would like.
Tip #16
Know Your Student’s Preferred Identifiers
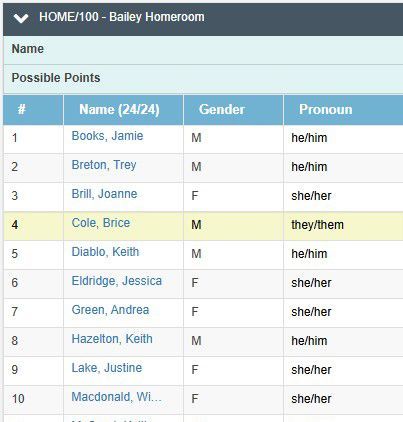
Put a Label on it (in the Gradebook) - Know Your Student’s Preferred Identifiers
As we pointed out in the previous tip, with the power of Views you can instantly arrange your Gradebook with the push of a button. These custom layouts can reveal specific demographic data associated with each student. In this tip we have a handy, specific use-case: setting up a custom View that highlights pronouns or alternative identifiers. With this, you’ll be able to quickly see the preferred way in which your students would like to be addressed.
Tip #17
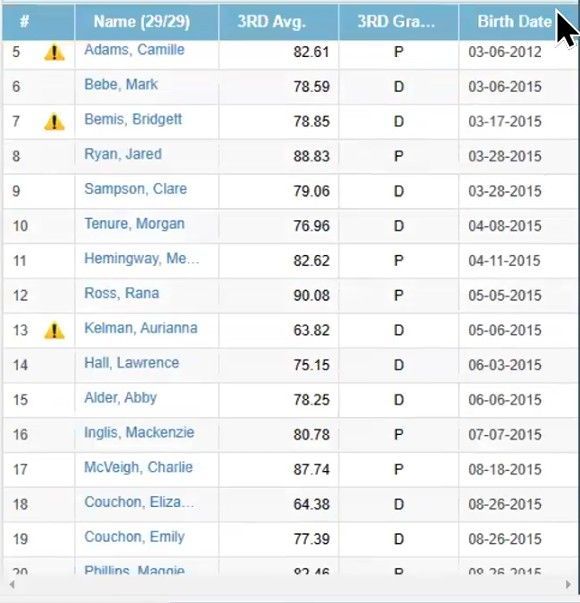
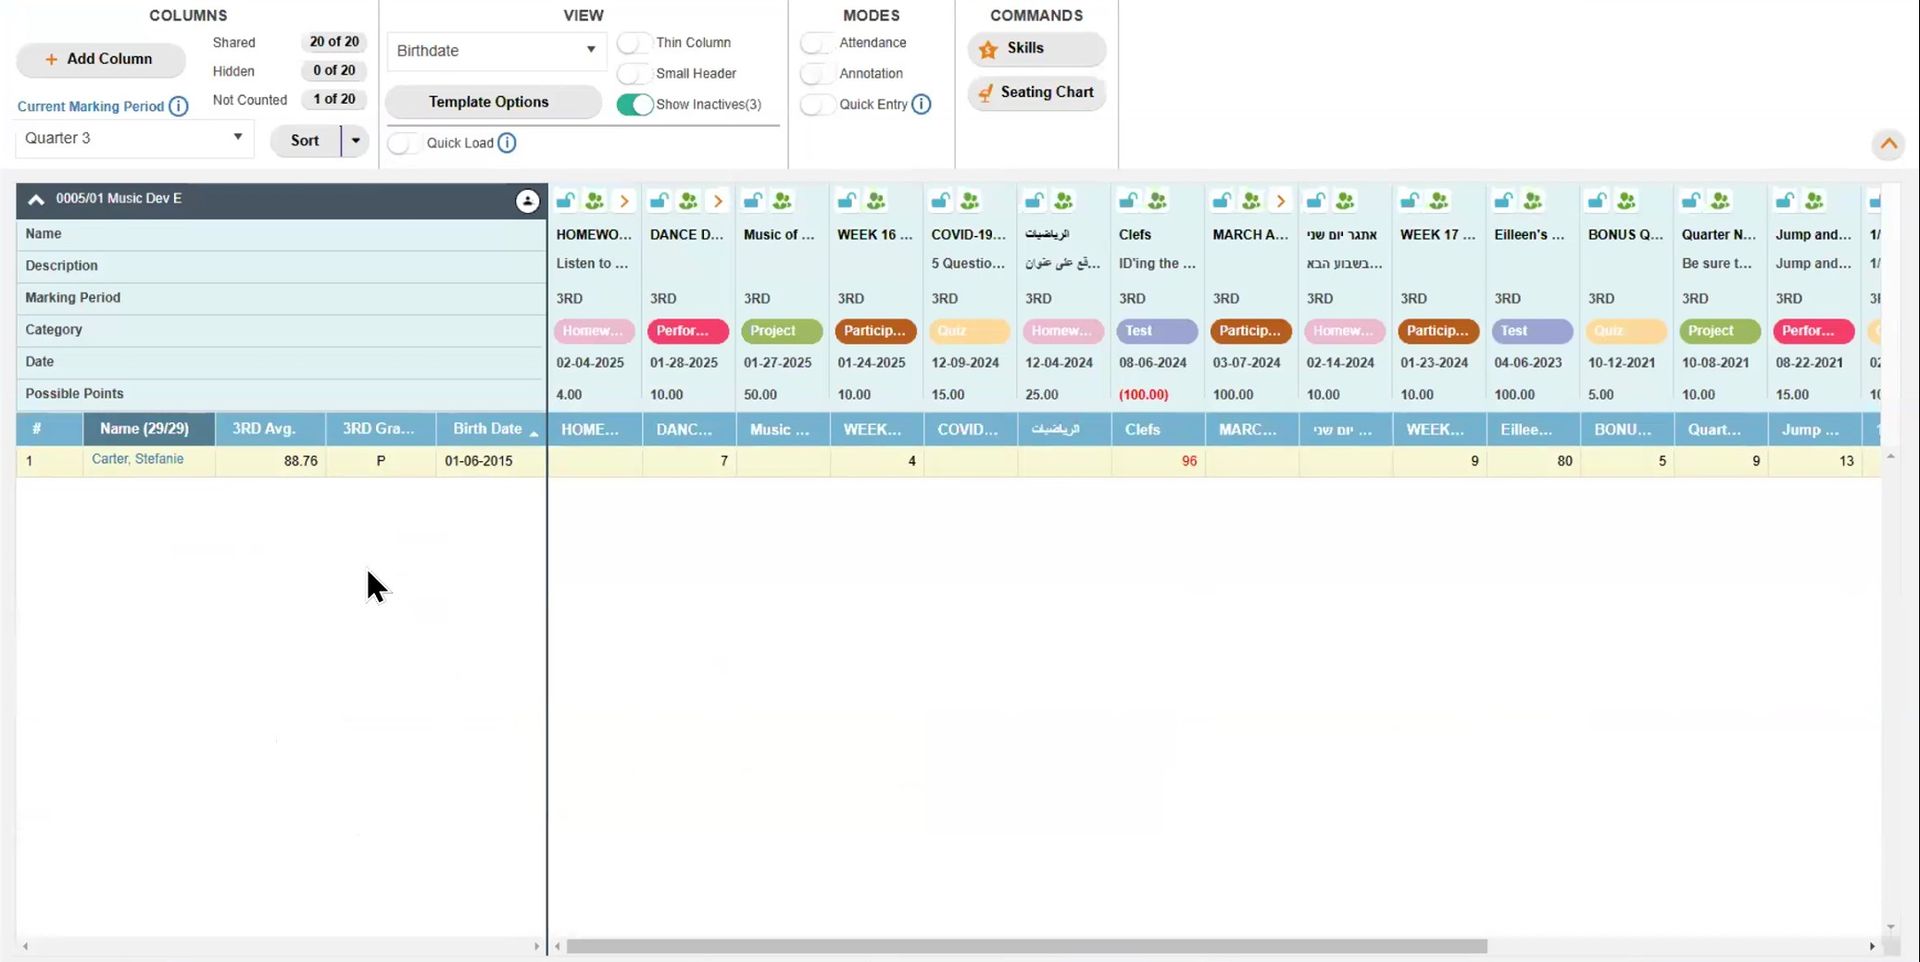
Set Up a Birthday List
Did Someone Say Cupcakes? – Set Up a Birthday List
The likelihood of it being someone’s “unbirthday” is extremely high, but that’s what makes a real birthday so special! Putting aside the Alice in Wonderland reference, another common application for Gradebook Views would be to create one that lists all birthdays. That way you can easily track who is celebrating (and be prepared for any home-brought cupcakes. 🧁)
Tip #18
Define Your 10 Custom Fields
You’re in Charge - Define Your 10 Custom Fields
Did you know there are 10 hidden fields that can be added to your Views? While playing around with creating custom Views in the Gradebook, you might have noticed that there’s a category for Teacher Defined Fields. These 10 fields come as a blank slate so you can use them to define unique, per-student data that has to do with your classroom in particular.
Maybe you teach a literature class, and each student had to pick their favorite author? Maybe you teach a secondary language class, and each student had to pick a related nickname for that language? Add it as a row of data in your Gradebook to track it.
The data that you enter in your Teacher Defined Fields is local for you and is not broadcast out to the AdminPlus database so you can track individualized snippets that the office doesn’t need.
When you set up a new View, choose the Teacher Defined Fields radio button. From there, move any of the fields over to your Left Pane Column list. Make sure to rename it so you know what it’s for. Once it’s saved and added as a View in the Gradebook, you can fill in the data for each student.
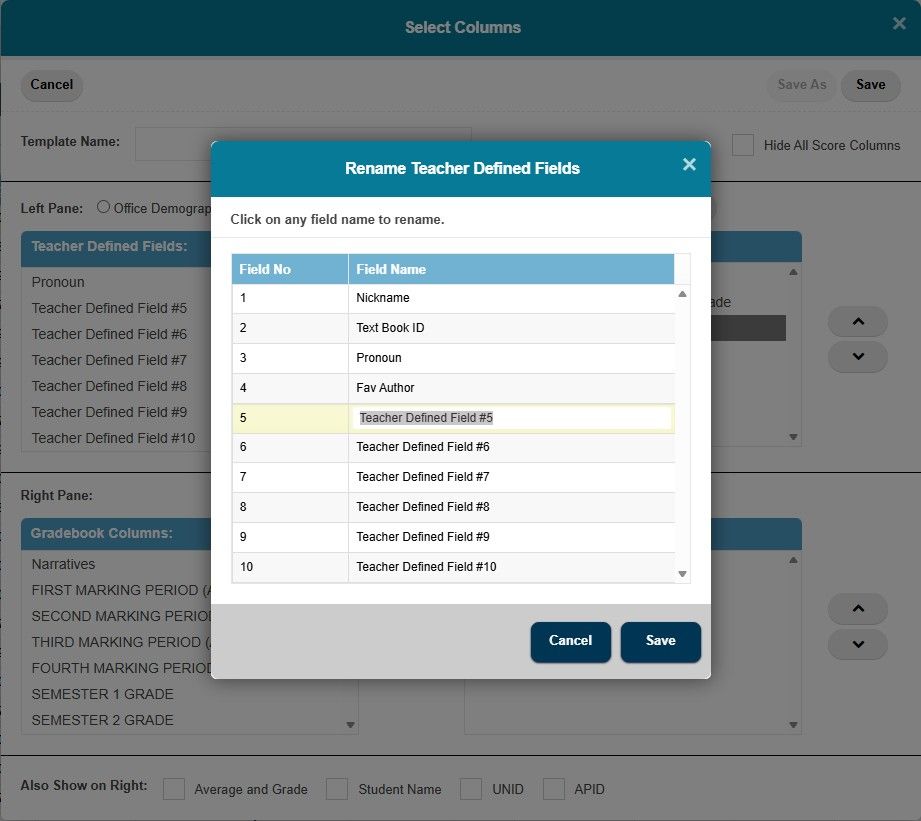
TeacherPlus Gradebook Set Teacher Defined Fields
Tip #19
Tally Lunch Counts
Is it Lunch Time Yet? - Tally Lunch Counts
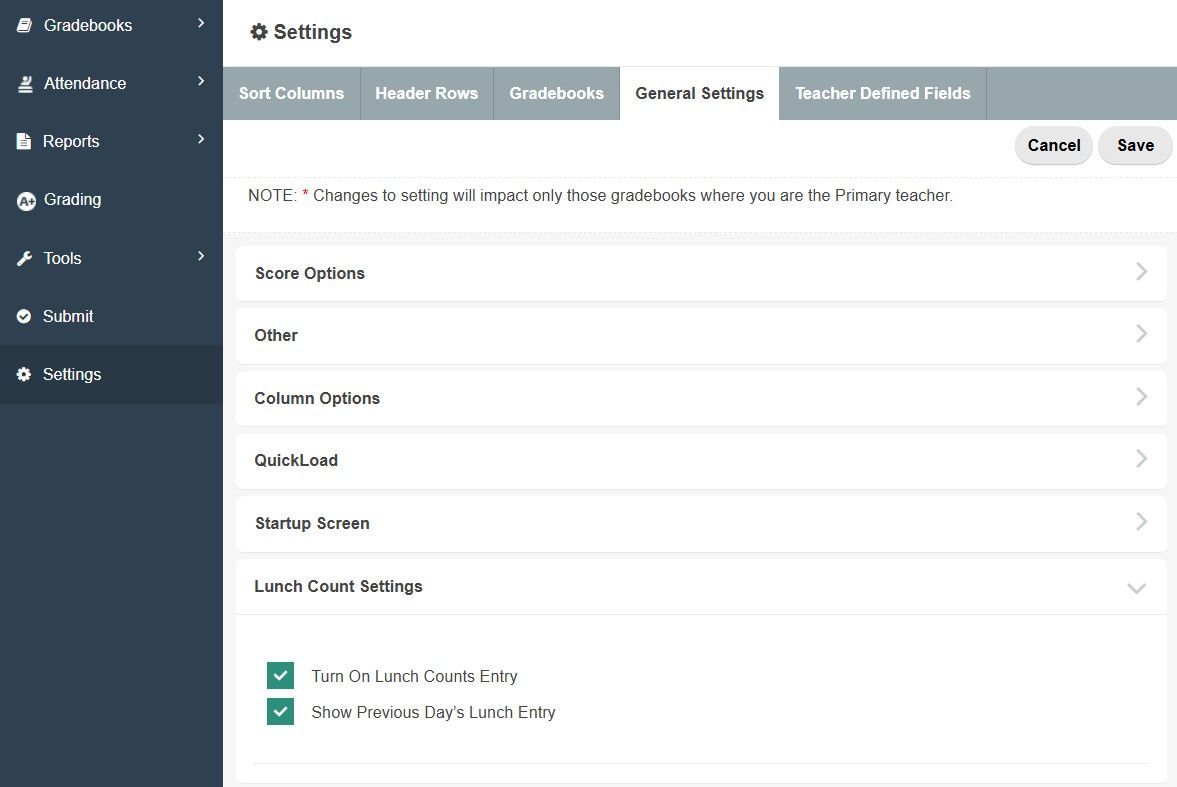
Get a jump on Lunch Counts ahead of time while you take attendance. If your school does in-classroom lunch counts, you can activate the Lunch Count Entry mode in the gradebook to track your students’ choices. An extra column will be added to your Attendance Mode where you can enter each pick. Click to toggle through the list of meal options set up by the school. From there, you can submit the Lunch Counts along with the attendance entries. This is a great way to let the cafeteria know in advance what food to prepare. It could also help with special occasions like field trips.
Turn on the Lunch Count Entry mode under Settings > General Settings > scroll down to see Lunch Count Settings.
TeacherPlus Gradebook Lunch Count Settings
Tip #20
Reference Attendance History
Time Traveling - Reference Attendance History
You don’t have to rev your DeLorean up to 88 mph to achieve a little time travel when it comes to historical attendance data. With the Weekly Attendance View, you can see a summary of an entire week's worth of classroom attendance data, including the total number of absences and tardies. This is an easy way for you to get some insightful information on students’ attendance habits.
You might also spot differences between the final Office Daily Attendance and your own classroom input if, for example, a student was marked absent by you, but then came in late and the Office ultimately marked them tardy. Although they may differ, you can be sure your entries will always remain the same when referring to the Class Attendance column.
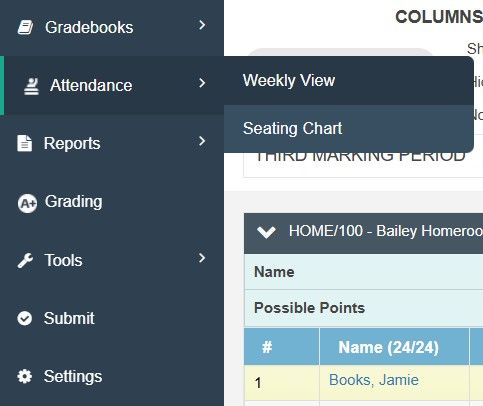
Turn on the Weekly Attendance View under the Attendance setting in the left-hand menu.
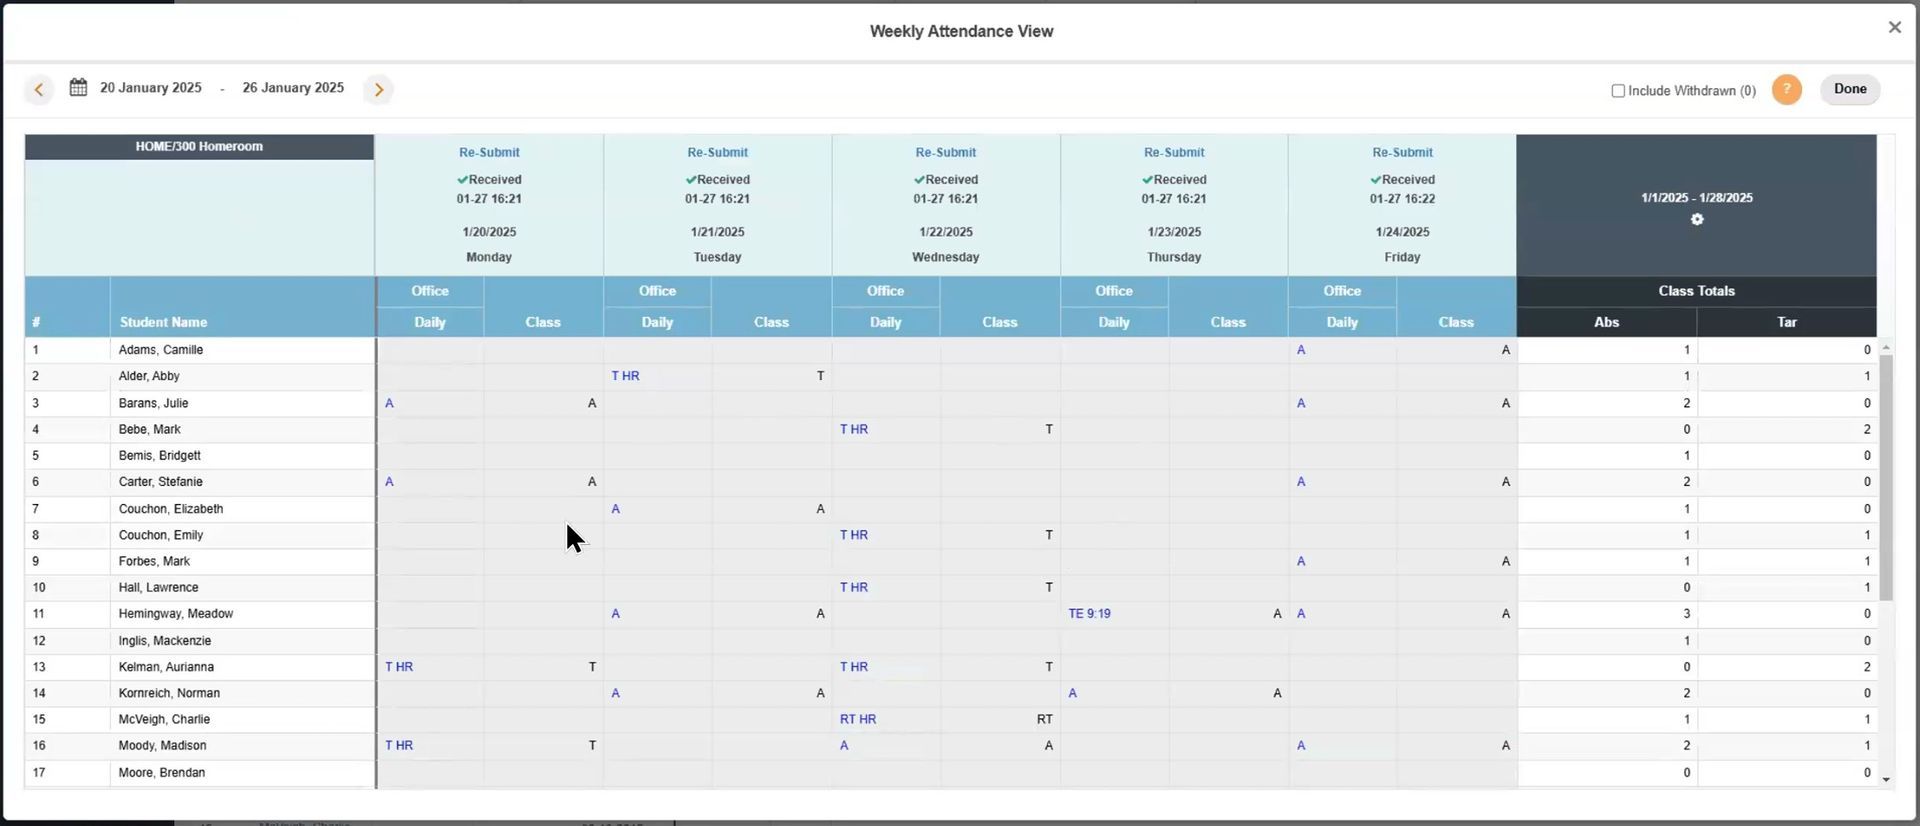
TeacherPlus Gradebook Weekly Attendance View
Tip #21
Take Note of Important Alerts and IEPs
Be Advised - Take Note of Important Alerts and IEPs
Keep in mind that the Gradebook can show you Student Alerts and IEP documents that might need special consideration.
If you see a little yellow “caution” icon next to a student’s name, then you know there’s something you should be aware of. This is set up within AdminPlus and can include information on allergies or other medical conditions.
You can also check if there’s an IEP for any of the students in your class by toggling on the IEP View or adding it to any of your Custom Views. You’ll see a green paper icon in the IEP column that you can click on to bring up the PDF. This document is sourced from the students’ Portfolio in the AdminPlus database, with other options for third-party integrations.
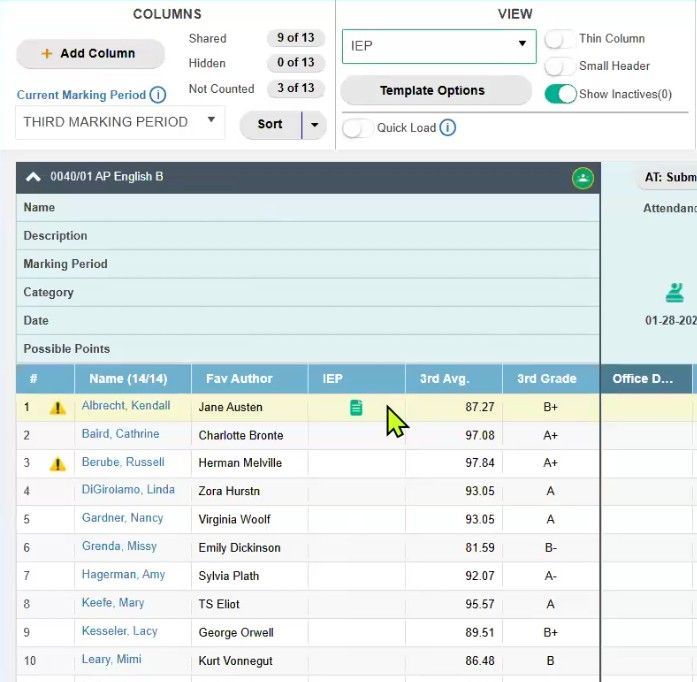
TeacherPlus Gradebook Inline Alert and IEP Icons
Privacy, Communication and Notes
Tip #22
Use Single-Student Privacy View
One-on-One Discussions – Use Single-Student Privacy View
Let’s say that you have a student that comes to your desk, and you need to show them something in your Gradebook. Or maybe it’s time for parent-teacher meetings and you need to present data for a single student. Protect the other students’ private grade data by only showing one line of information in your Gradebook.
Right-click the student’s name and choose Show Only (Hide Other Students). This is a quick way to hide everyone else's grades for a private, one-on-one discussion. When you are done, right-click the student’s name again and choose Show All Students to bring everyone back onto the view.
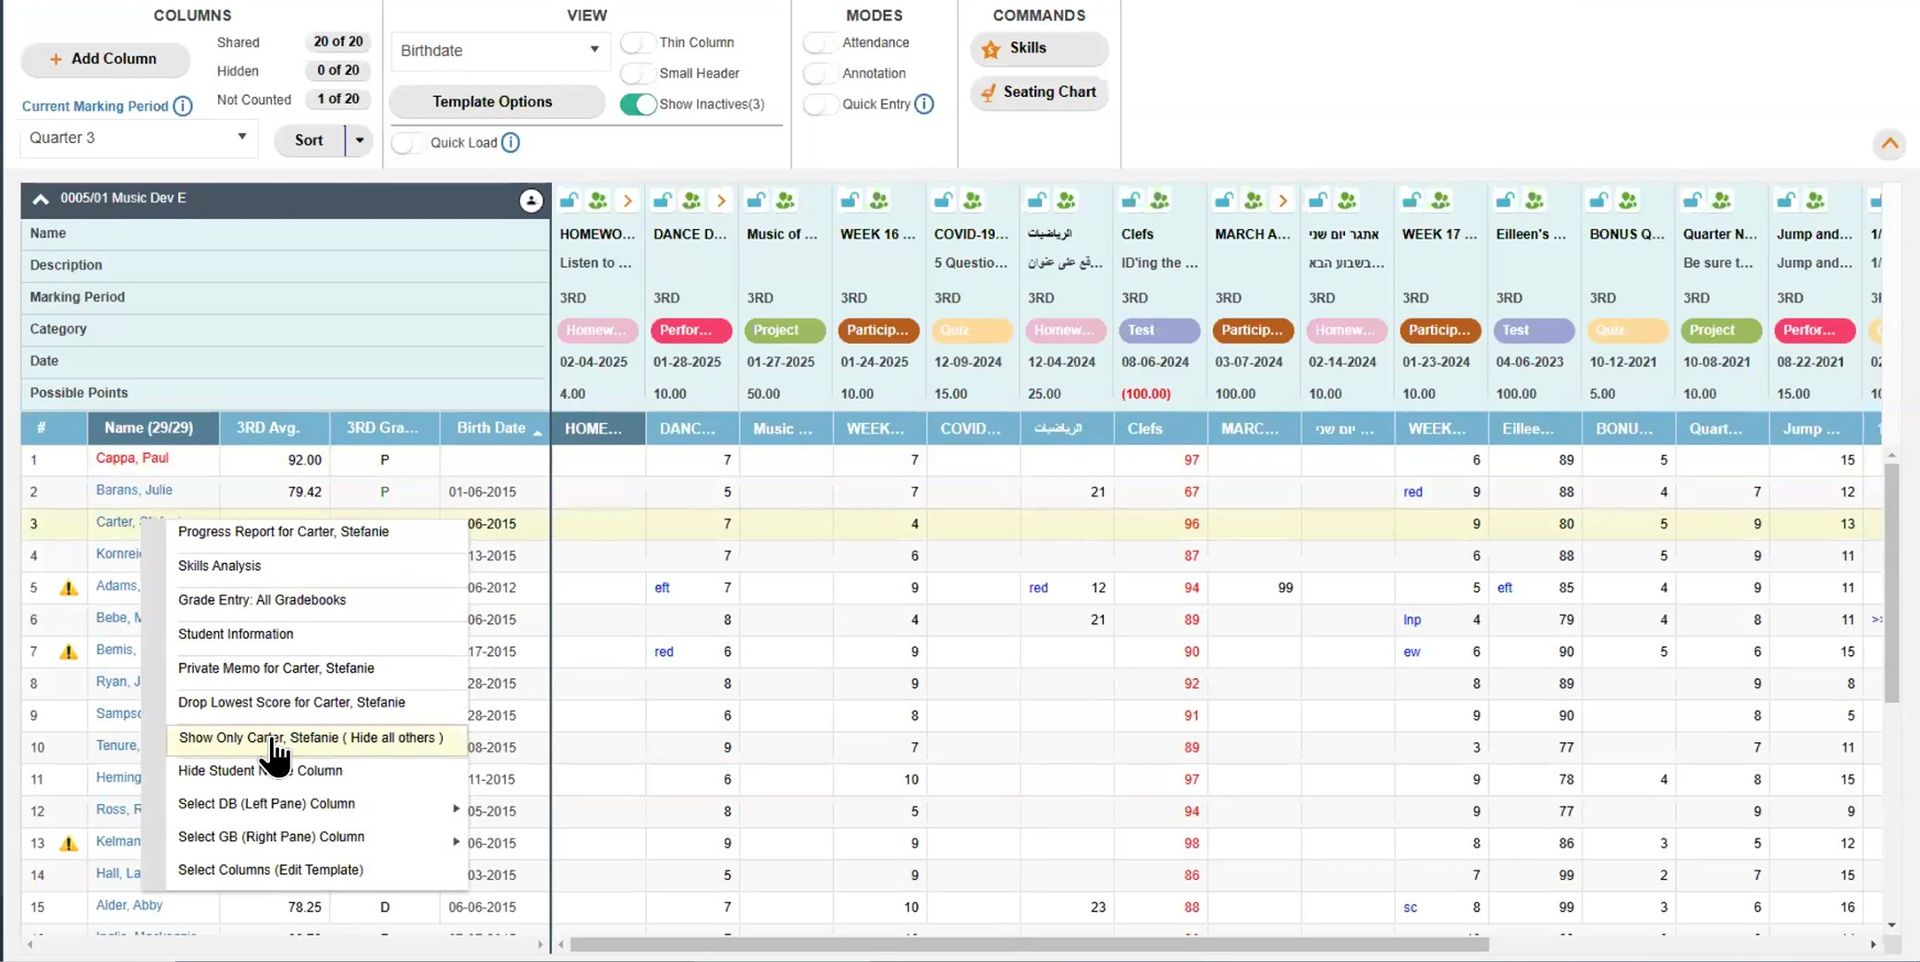
(MOUSE OVER IMAGE) TeacherPlus Gradebook Displaying All or One Row of Student Data
Tip #23
Generate Your Own Reports
Make it Official - Generate Your Own Reports
One of the most powerful functions any gradebook software can perform is generating reports – taking all that data that you lovingly input over the course of the school year and compiling it into an easy-to-understand summation. For this tip, let’s talk about two great options: Progress Reports for each student, and Custom Reports for the class.
Progress Reports (per Student)
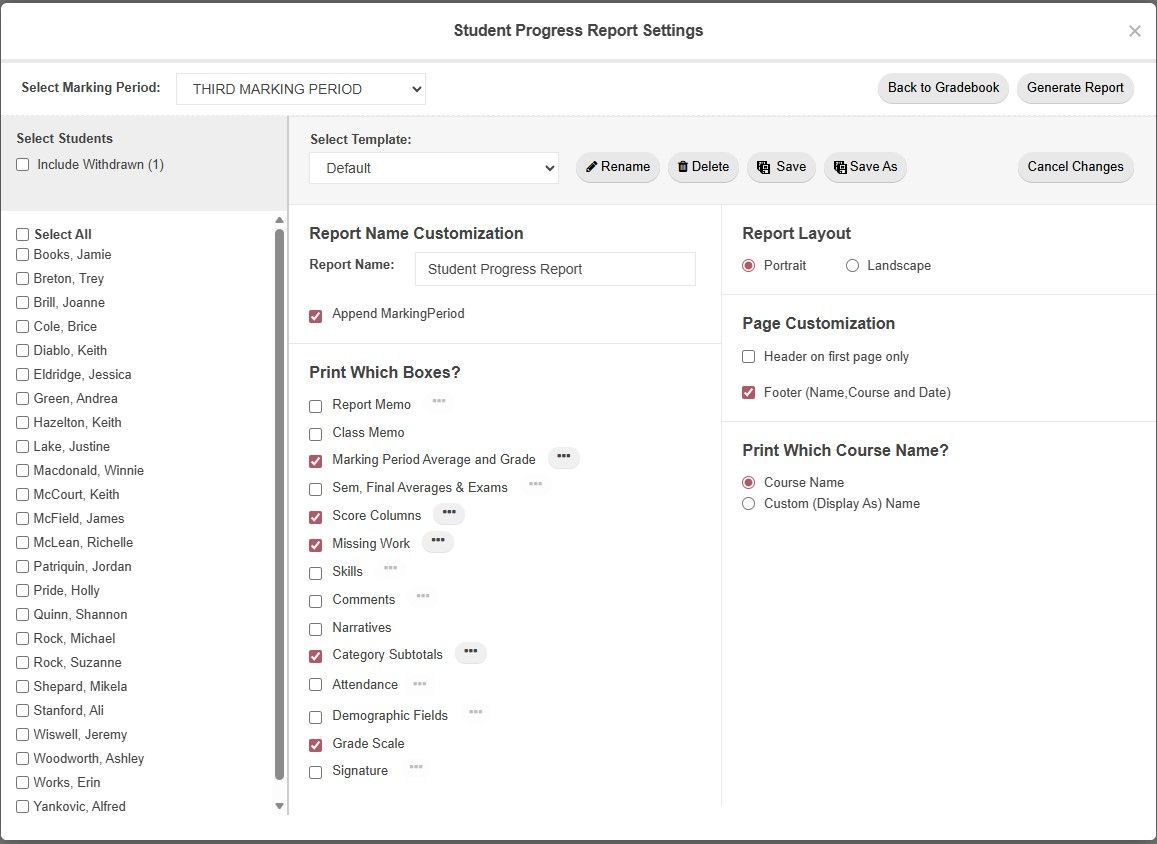
Progress Reports are a great way to understand the big picture for an individual student in your class, even in the middle of the semester. No need to wait for final Report Cards from the office. These can be generated by teachers at any time and include detailed data about classroom assessment scores, possible points, missing work, skills and standards, attendance, etc.
To generate the report, right-click the student’s name and choose Progress Report. You can also use the left-side menu to go to Reports > Student > Progress Report.
Take advantage of the other report settings to pick what’s included in the report. This way, you can bring this report along to your next parent-teacher meeting and customize what parents see. If you save multiple templates, you could create a "Simplified" version for quick updates or a "Comprehensive" version with more comments, narratives and drill-down details.
Include a signature field if you want the parent to sign it right then and there at the meeting. Or upload it to PlusPortals for parents to see on their own time.

Custom Reports (per Gradebook)
While Progress Reports are great for per-student insights, other Custom Reports can be created to show general Gradebook data across your whole class and different marking periods. To get to your Report Library, navigate to Report in the left-side menu and choose Custom Reports. This is where you create and save your custom-made versions. Set your query for grades, averages, scores, skill grades, comments, narrative, attendance by student, or attendance totals by class. Include demographic fields like address, homeroom, IEP, counselor, and more. Once you run your Custom Report, you can even take it a step further by generating a Progress Report for all students included in the results, helping you narrow down any student you might want to meet with, Progress Report in-hand.
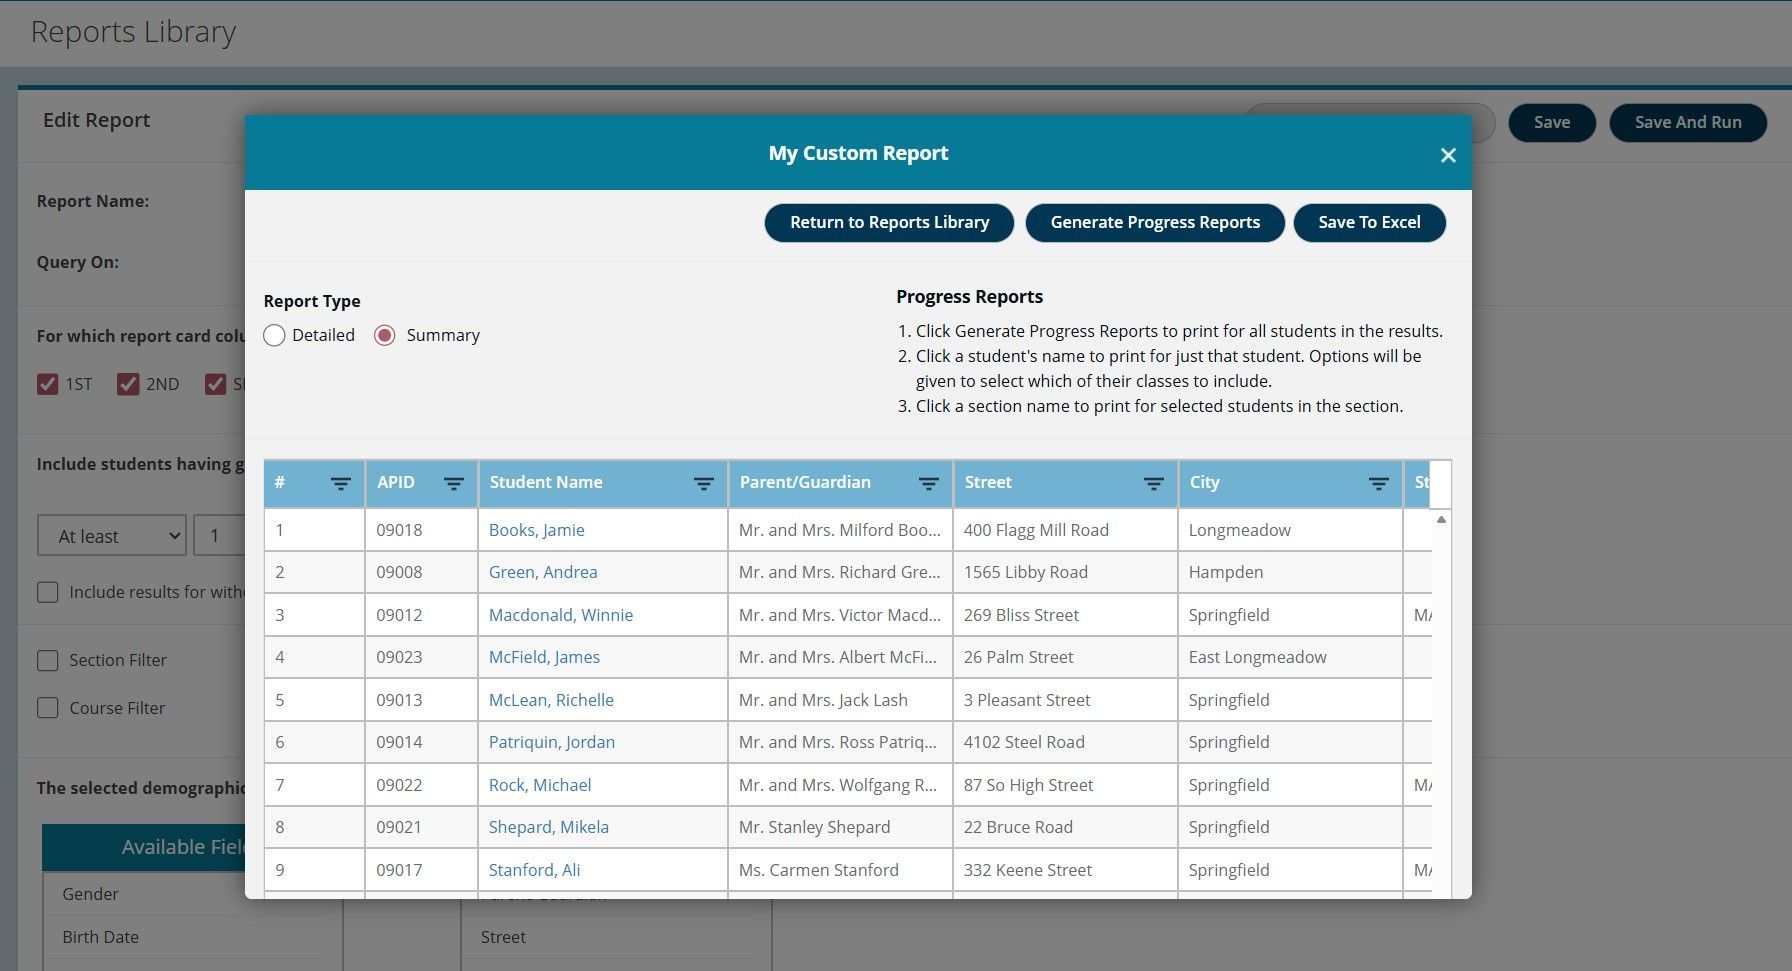
TeacherPlus Gradebook Custom Report Output
Tip #24
Add a Note - Memo vs. Narrative vs. Comment
When, where, what? - Private Memo vs. Narrative vs. Comment
There are multiple places where you can add notes called Memos, Narratives and Comments. But what’s the difference and how do you use them? For this tip, we’ll review each type:
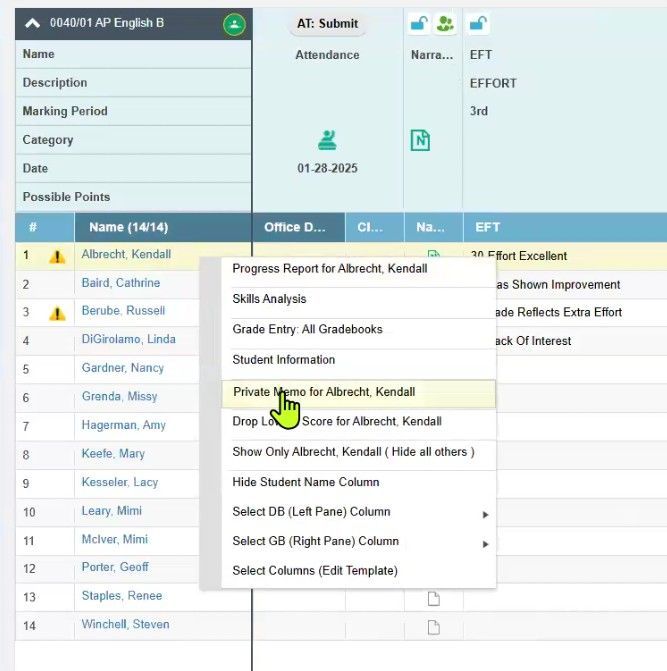
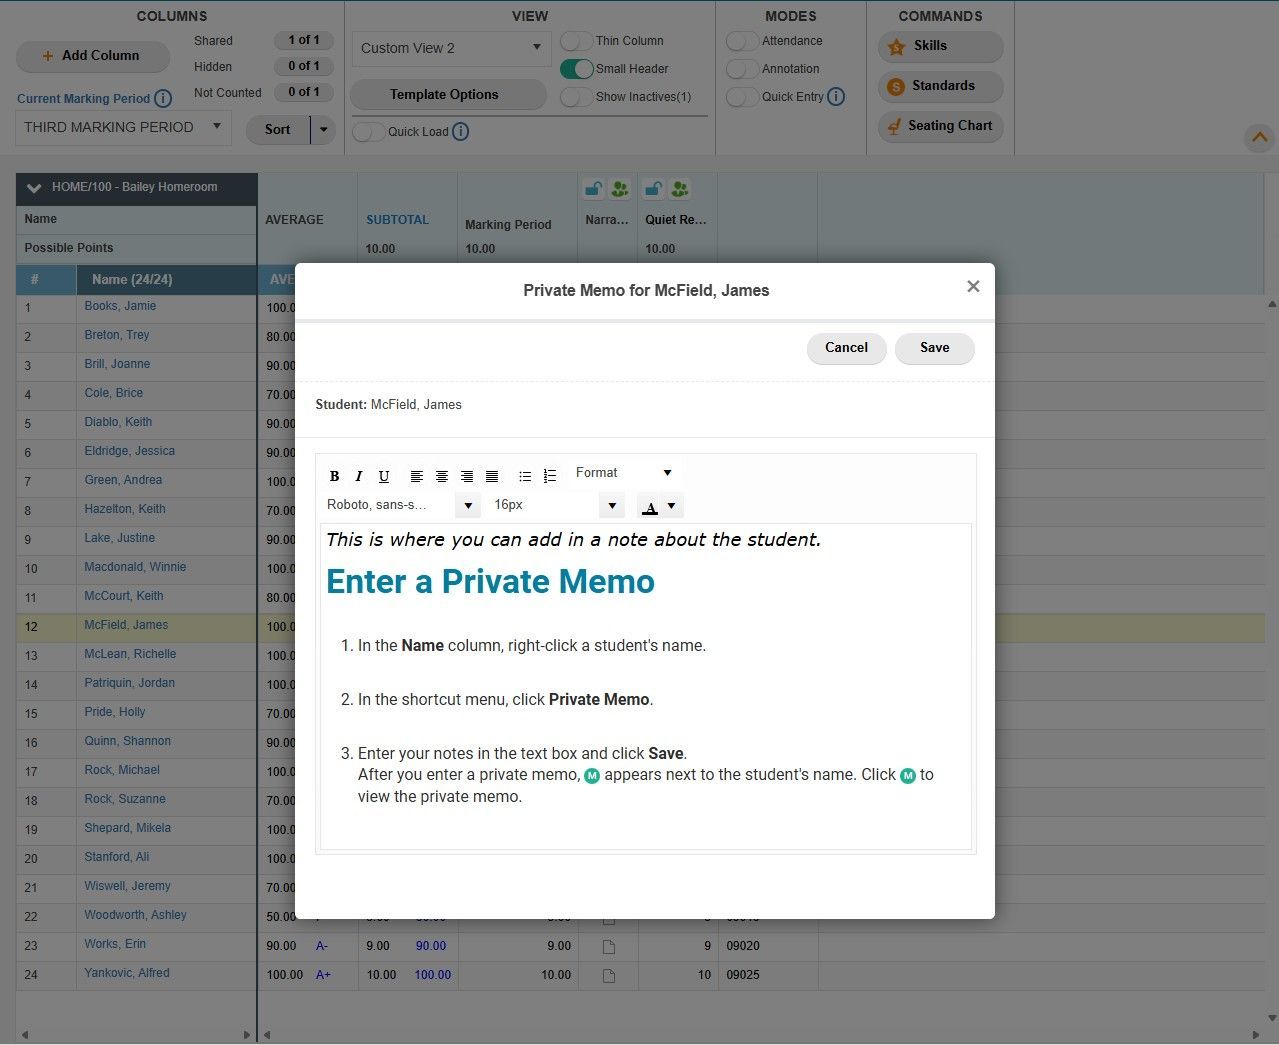
Memos (Internal Reference)
Memos serve as a way to add internal notes about individual students. Right-click a student's name to type up a Private Memo. You can keep it brief and simple or add formatting with lists, headings and colors. These notes are for your eyes only (and school admins) and are never broadcast to parents or students. When applied, a green “M” icon will appear next to the student’s entry where you can reference the Memo at any time.
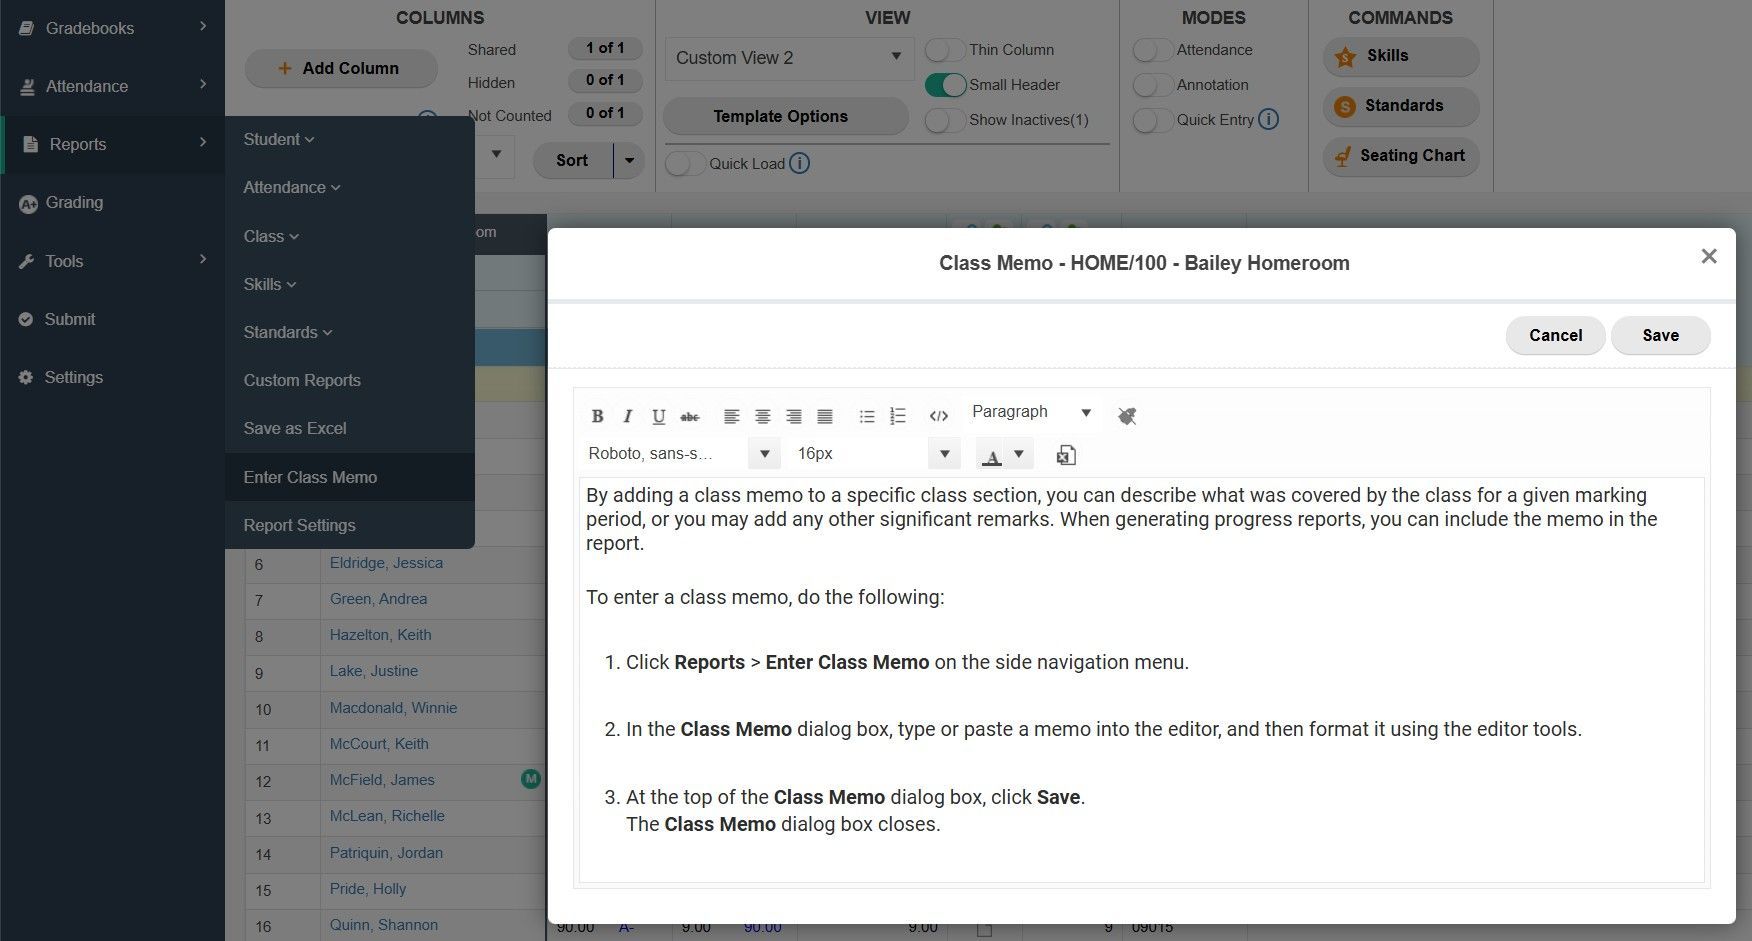
Class Memos (Progress Reports)
Not to be confused with a private, individual Memo that is attached to a single student, you can also create a Class Memo. This is a summary paragraph about what the class is learning and can be included in the Progress Report.
Add a Class Memo by going to Reports > Class Memo.
TeacherPlus Gradebook Class Memo
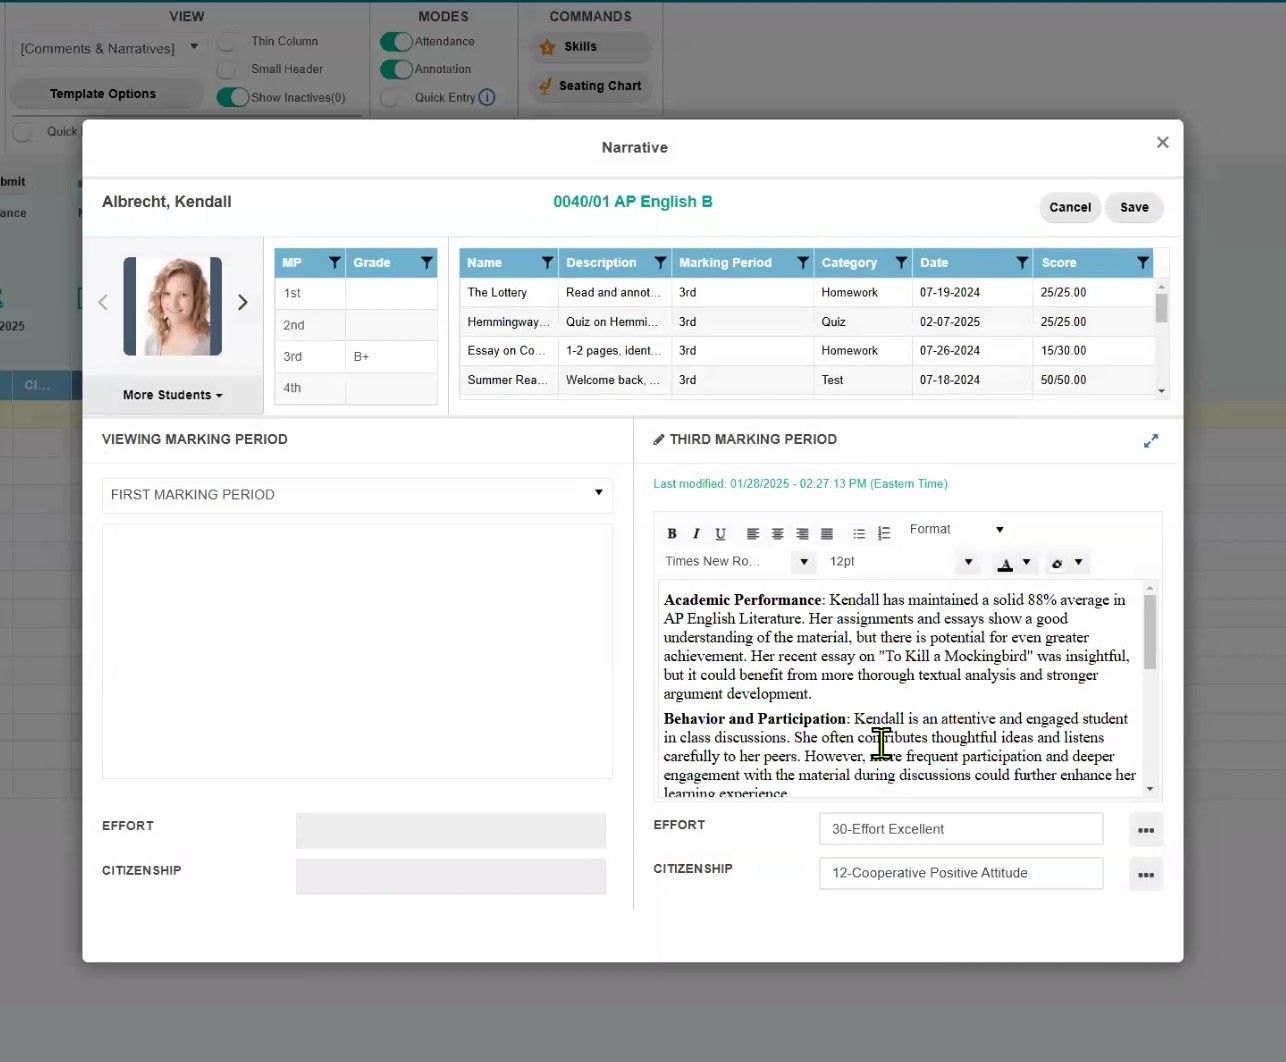
Narratives (Progress Reports)
Narratives will show up on Progress Reports and are perfect for detailed feedback to remark on a student's progress and behavior. They can be long-form essays, depending on the character limit your school has set.
To add a narrative, first turn on the Comments & Narratives View. This is an out-of-the-box View that comes with the Gradebook. You can also add Narratives to any new View that you create.
In the Narrative column, click the paper icon to bring up the Narrative creation tools. From here you reference current and past marking period data while you add your notes.
TeacherPlus Gradebook Narrative
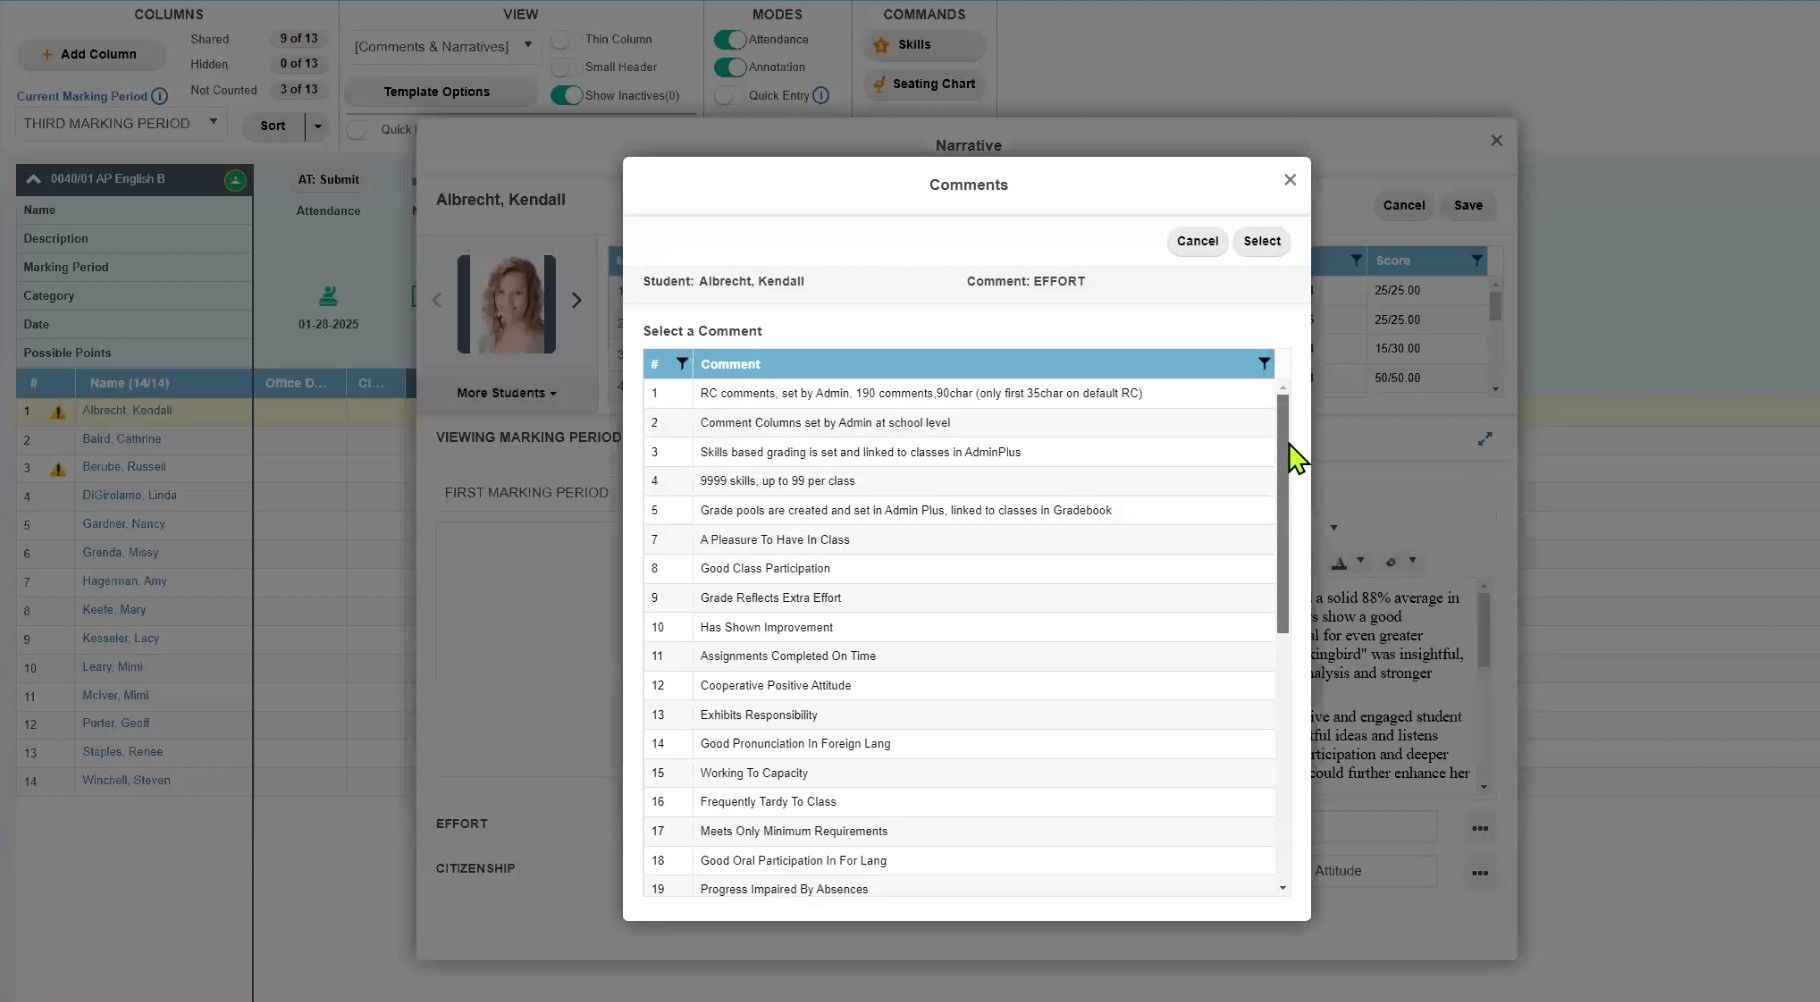
Comments (Pick from a List)
Comments go hand-in-hand with the Narratives and are also shown in the Progress Reports. They can be found towards the bottom of the Narrative input screen. These are pre-defined little phrases that are set in the TeacherPlus Management Site by the school. The school can also define categories for the Comments. By default, you might see “Effort” and "Citizenship” as the two category types. From there, you can choose from a list of phrases. Choose one that applies to your student’s progress and behavior like “great work”, “positive attitude”, etc.
TeacherPlus Gradebook Comments
Learn More
Interested in learning more? Check out our Release Notes and Help Guides here: https://support.rediker.com/support/solutions/14000076362
Become a TeacherPlus “Master” by expanding your understanding of the many features and functions that come with the Gradebook. Contact us to be paired with one of our expert Rediker Professional Development Trainers today. Reach out to your Rediker Account Manager or email sales@rediker.com to get started.
Share this Post:
The app provides enhanced communication between schools, parents, and students, replacing the former ParentPlus and StudentPlus apps with a unified, streamlined experience.
Rediker introduces an integrated, powerful, all-in-one fund accounting platform for private and independent schools to help to simplify billing, accounting, and financial management.
In this guide, we’ll explore why an updated website is crucial, outline the transition process, and share actionable insights for a seamless upgrade.